Tag Archives: Professional Map Making

The simplest and most intuitive drawing mode

To draw objects in OCAD, a drawing mode must be selected.

Probably the two most commonly used are the Curve mode (e.g. to draw contour lines) or the Straight line mode (e.g. for buildings).

The simplest way to draw objects in OCAD is to mix these two drawing modes.

First, the following settings must be made.

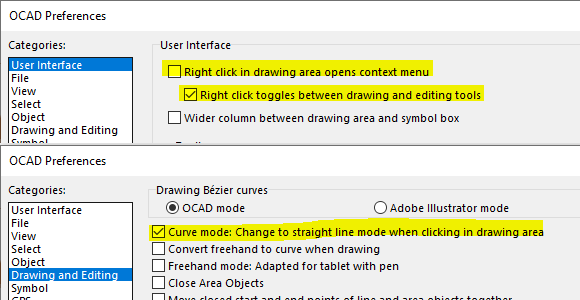
  1. Activate Right click toggel between drawing and editing tools in the OCAD Preferences > User Interface categorie.
  2. Activate the option Curve mode: Change to straight line mode when clicking in drawing area in the OCAD Preferences -> Drawing and Editing categorie.
Settings in the OCAD Preferences

Let’s draw something! It’s as simple as that:

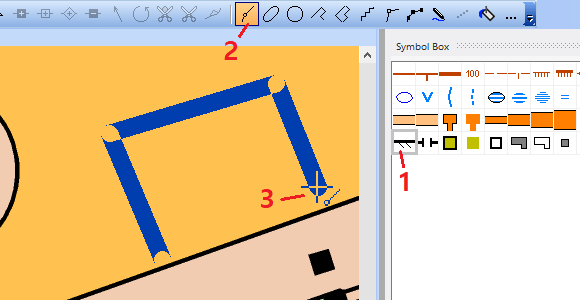
  • Select an area or line symbol (1)
  • Choose the Curve mode (2)
  • Click in the drawing area. (3)
  • Each additional click inserts a new vertex.
  • Right-click to finish the object.
  • Right-click again to draw a new object.
Drawing with Straight line mode

You can also click+drag the cursor to draw a Bézier curve.

As you will notice, this way of drawing is very simple and intuitive.

However, in contrast to the Straight line mode, Normal vertices and no Corner vertices are inserted. This can lead to different representations of line objects.
It is recommended to visually check the line objects and possibly change the vertex types.

Left object: Corner vertices | Right object: Normal vertices

Note: For each symbol, you can define a Preferred Drawing tool. You can change the settings by right-clicking on a symbol in the symbol box.

64bit vs 32bit OCAD version

The latest OCAD update no longer creates a 32-bit version for most users.

What version of OCAD is installed?

For OCAD Orienteering, OCAD Starter, OCAD Course Setting and OCAD Viewer, OCAD Setup will only install the 64-bit version.

Note: In the past, certain features were only available in the 32-bit version (e.g. real-time GPS). These features now also work in the 64-bit version.

For OCAD Mapping Solution, OCAD Setup still installs both the 64-bit and 32-bit versions.
The reason for this is that some database features are not available in both versions:
– Microsoft Access database files depend on the installed version of the Access Database Engine.
– dbf database file cannot be used in OCAD 64-bit version

What does this mean for you?

You may have to recreate some OCAD shortcuts.
Go to C:\Program Files\OCAD\OCAD 2018 Orienteering. There you will find the ‘OCAD 2018 Orienteering.exe’. Right-click on it and Create Shortcut.

Otherwise you will not notice any effect.

What’s the difference between the 64-bit and 32-bit versions of OCAD?

The 64-bit version of OCAD isn’t faster than the 32-bit version, but it can allocate more RAM. This is important when loading large raster background maps or DEM files.

Other things to note

Almost all computers today run a 64-bit version of Windows. However, if the installed Windows version is 32-bit, OCAD will only install a 32-bit version of OCAD.


Use mouse wheel to zoom in and out instead of scrolling

There is a new option in the OCAD Preferences to use the mouse wheel to zoom in and out instead of scrolling.

Use mouse wheel to zoom in and out instead of scrolling is unchecked (default settings):
Scroll Mouse Wheel = Scroll map vertically
Scroll Mouse Wheel + CTRL = Zoom in and out
Scroll Mouse Wheel + SHIFT = Scroll map horizontally

Use mouse wheel to zoom in and out instead of scrolling is active:
Scroll Mouse Wheel = Zoom in and out
Scroll Mouse Wheel + CTRL = Scroll map vertically
Scroll Mouse Wheel + CTRL +SHIFT = Scroll map horizontally

GeoPackage import in OCAD

A GeoPackage (GPKG) is a data format for geographic information system implemented as a SQLite database container.

With the latest Update, it is now possible in OCAD in a test version to import point, linestring and polygons from GeoPackage. We are grateful for feedback.

More about the GeoPackage import.

How to add logos in OCAD

In OCAD you can add raster logos in the Layout menu or you can import a vector PDF file.

Add raster logos

Raster logos can now be embedded directly in the OCAD file instead of just linking to the original file.

  • Embed: By embedding the raster images directly in the OCAD file, the file size increases accordingly. However, when passing on OCAD files, it is no longer necessary to ensure that the layout images are also supplied and saved in the correct folder.
  • Link: If your map contains layout images and you pass your file forward to another person, you need to ensure that the layout images are also supplied and saved in the correct folder, as they are not part of the OCAD file.

You can also select a linked image in the Layout object list and the Convert button becomes active. Press the Convert button and the selected image will be embedded.

In the best case the images are available as .png or.jpg files. Supported image files are also .bmp and .gif. Tiff files can be linked, but not embedded.

If there are only few and distinct colors with no color gradient, e.g. OCAD logo, the .png file is the best choice. Please note that PNG transparency is not supported. Save the logo as .jpg file if there are color gradients, e.g. IOF World Cup logo.

OCAD logo and IOF World Cup logo

The color model for layout images in OCAD is RGB. If you add raster logos, that are saved as CMKY logos, OCAD will convert the colors.

Make sure the raster images are not unnecessarily too large (e.g. some MB size). In this case, resampling before adding is recommended (e.g. in Paint or IrfanView).

More about the Layout menu.

Add vector logos

It is also possible to import logos in vector PDF format. In this case OCAD creates Image objects, which have the correct CMYK color values and can be scaled arbitrarily.