OCAD has updated its symbol sets for orienteering and sprint orienteering after a revision by the IOF.
The new symbol sets are valid from 1st February 2024 and mandatory for IOF events from 1st January 2025.
Update Orienteering Symbol Set due to ISOM 2017-2 Revision 6
The most important changes:
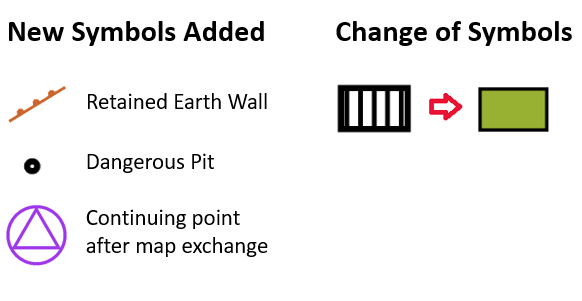
New symbol added for Retained earth wall | New symbol added for Dangerous pit | New symbol added Continuing point after map exchange | Renumbering of certain symbols | Certain symbols for minimum sizes removed
Update Sprint Orienteering Symbol Set due to ISSprOM 2019-2 Revision 6
The most important changes:
New symbol added for Retained earth wall | New symbol added Continuing point after map exchange | New symbol added Area with obstacles | New symbol added Area runnable at lower level (521) |Renumbering of certain symbols | Certain symbols for minimum sizes removed
How to update your maps to the new specifications?
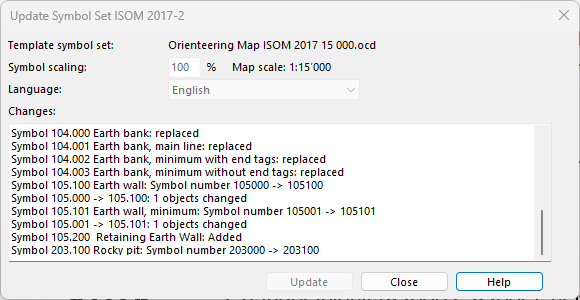
In OCAD, you can update a map drawn with ISOM 2017-2 or ISSprOM 2019-2 to the latest symbol set by using the function Update Symbol Set.
For maps that are drawn with an older symbol set, use the function Symbol Set Conversion. Check the page Symbol Set Overview to find out which symbol set you are using.
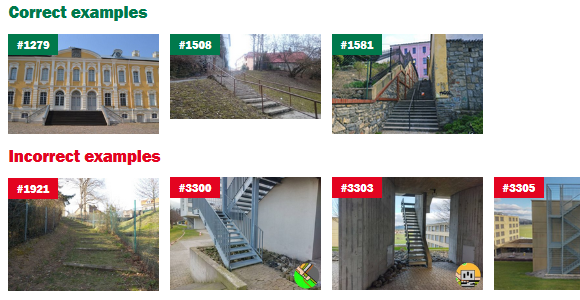
In this article we present different ways of drawing stairs in OCAD and what to look out for.
If stairs are drawn too small or too narrow, this greatly impairs legibility and the staircase can easily be mistaken for an impassable object (especially if the print quality of the circles is poor).
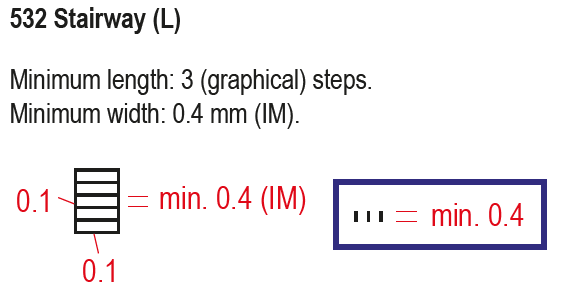
How is the stairway symbol defined?
Steps of a stairway shall be represented in a generalized manner. Contour lines shall be cut out for better legibility, if they touch stairways.
This means that when you are drawing stairs you should make sure that…
(1) treads are not drawn with too little spacing (min. 0.4mm)
(2) contour lines are cut out
(3) stairs are not drawn too narrow (min. 0.4mm)
(4) more than 2 steps are drawn (min. 3)
By the way: In addition to the symbol definition, the IOF O Map Wiki also contains images with correct and incorrect examples.
Draw steps individually or use stairway symbol
There are basically two ways to draw steps:
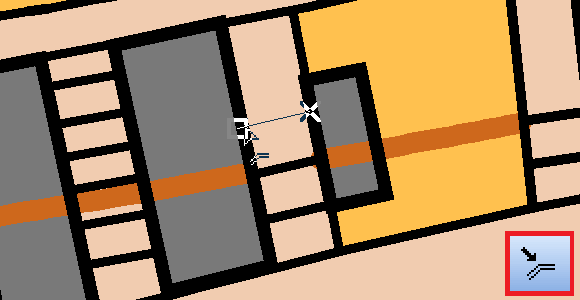
Use the symbol Step or edge of paved area (symbol 501.100) to draw steps individually
Use the symbol Stairway (symbol 532.00) to use a predefined stair width.
Use stairway symbol
The stairway symbol is suitable for straight staircases. The minimum width and tread width comply with the IOF specifications. The stair filling (colour. 44 Brown 30% – stairs) covers the contour lines, so no cutting of contour lines is needed. Problems arise with curved staircases (2) or staircases with varying widths. Often the predefined width does not fit and leads, for example, to thick edges (3). In such a case, the predefined stair symbols can be duplicated and the width changed afterwards. The whole width of the staircase should be visible and if not, building, walls, etc., should be reduced in size (4). When drawing, it is also important to note that the beginning and end of the stairs (1) must be examined and edited if necessary.
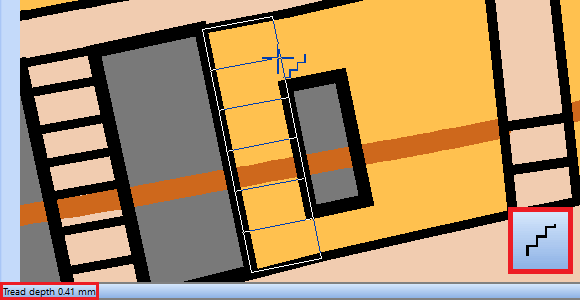
Draw steps individually
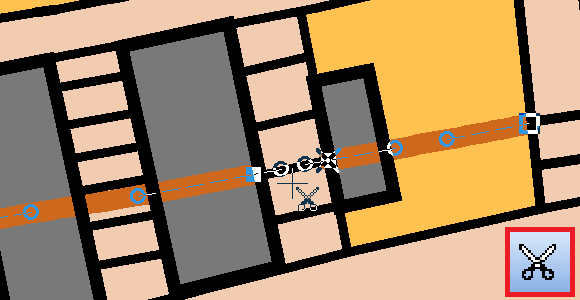
You get the most flexibility when you draw steps individually. For that, you can use the symbol Step or edge of paved area (symbol 501.100).
With the Stairway mode you can easily specify length, width and now also the tread depth (step distance). This is displayed at the bottom left of the status bar.
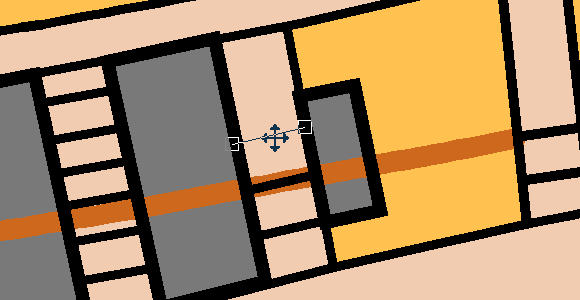
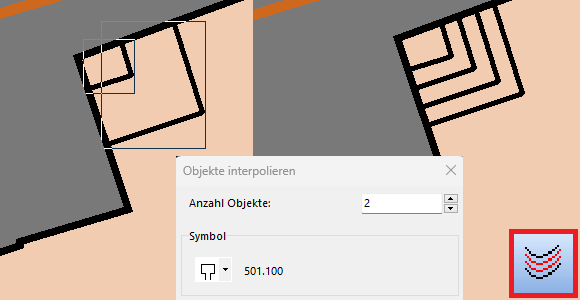
Individual steps can be copied (Ctrl + C), pasted (Ctrl + V) and moved to the correct position with the mouse or arrow key.
The International Conference on Orienteering Mapping (ICOM) is a traditional event where mapmakers, and those with an interest in orienteering maps, from around the world discuss and share information about the latest mapping standards, techniques and developments.
This year’s ICOM was held at the end of June during the World Orienteering Championships in Denmak.
From OCAD Inc., Thomas Gloor presented the OCAD Sketch App and Gian-Reto Schaad showed how sprint maps can best be updated to the new standards ISSprOM 2019-2.
Three new orienteering symbol sets are available in the latest OCAD Update:
Updated ISSprOM 2019-2
Minor Update to ISOM 2017-2
New ISMTBOM 2022 released
Updated ISSprOM 2019-2
The International Specification for Sprint Orienteering Maps (ISSprOM 2019-2) has been updated and is valid from 15th January 2022.
The sprint orienteering symbol sets in OCAD have been updated to meet the new specifications and are included in the latest OCAD Update.
The biggest changes concern the representation of complex urban structures with multiple levels, such as tunnels, bridges or passages. In addition, impassable vegetation and impassable hedges are again displayed with dark green color.
In OCAD, existing sprint orienteering maps can be updated to the new standards in two different ways.
If your map contain the original ISSprOM 2019 symbol set, use the Update Symbol Setfunction.
To update an old sprint orienteering symbol set, use the function Symbol Set Conversion.
Minor Update to ISOM 2017-2
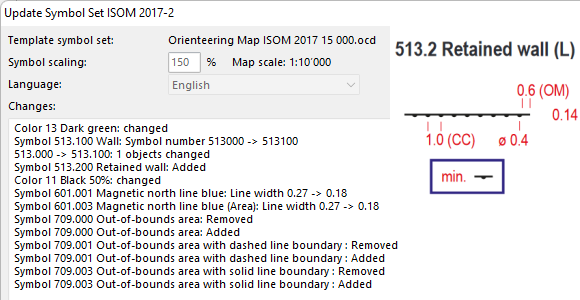
There was a minor update to The International Specification for Orienteering Maps (ISOM 2017-2) to make the parameters of some symbols consistent (e.g. 709 Out of bounds area). Also, a new symbol 513.2 Retained wall has been added to allow mapping of walls visible from only one side.
In OCAD, existing forest orienteering maps can be updated to the new standards in two different ways.
If your map contain the original ISOM 2017-1 or ISOM 2017-2 symbol set, use the Update Symbol Setfunction.
To update an old forest orienteering symbol set, use the function Symbol Set Conversion.
New ISMTBOM 2022 released
The International Specification for Mountain Bike Orienteering Maps (ISMTBOM2022) has been released and is valid from January 2022.
The mountain bike orienteering symbol sets in OCAD have been updated to meet the new specifications and are included in the latest OCAD Update.
Compared to the Final Draft from last October, there were only a few minor changes, such as additional symbols for narrow rides or linear traces through the terrain.
In OCAD, existing mountain bike orienteering maps can be easily updated to the new standards using the Symbol Set Conversion function.
With the latest OCAD Update, we added new symbol sets for mountain bike orienteering (MTBO). The symbol sets are based on the final draft of the ISMTBOM 202x, released by the Internation Orienteering Map Commission, in cooperation with the MTBO Commission. Please find more information here.
In OCAD, you can use the symbol sets for testing in different ways:
To start a new MTBO Map
To update an old MTBO Map
To change an Foot Orienteering map into a MTBO map
Start a new MTBO map
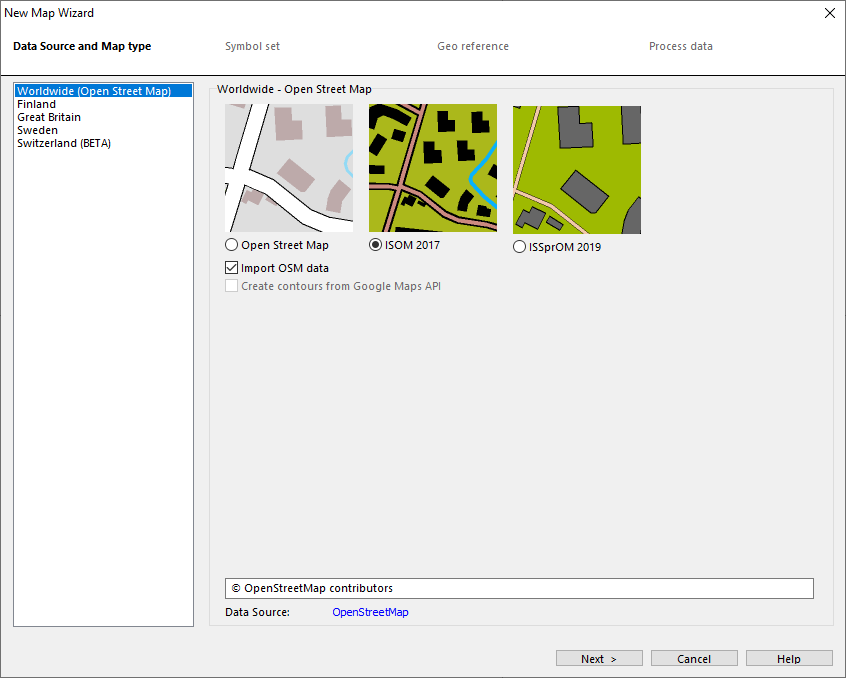
We recommend you to start a new map with the New Map Wizard. There you have the possiblity to directly georeference the map and import OSM data and convert these data into OCAD symbols.
Start the New Map Wizard (menu File > New Map Wizard). Choose optionally to Import OSM data.Load the ISMTBOM 202x symbol set and the OSM to ISMTBOM 202x.ocdCrt. In this example, we create a map for 15’000 scale. If you like another scale, you can go to menu Map > Change Scale after you run the Wizard. Enlarge/reduce the symbols, when you change the scale.Choose a map extract and set the coordinate system. The map extent you see in the window will be imported into OCAD. Alternatively, specify coordinate values. Click on Create when you are done.You will get a georeferenced map with the MTBO symbol set and OSM objects.
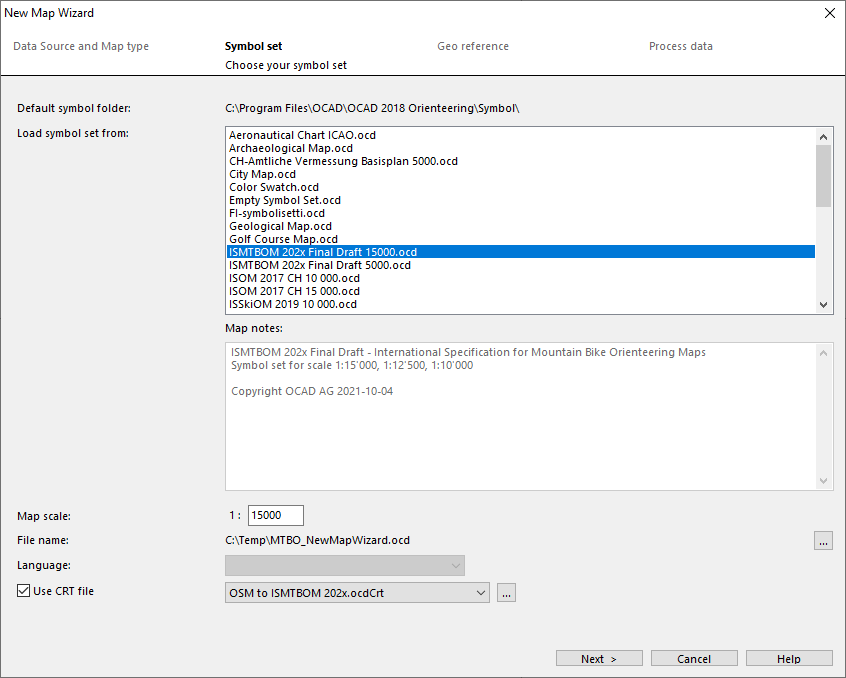
To start with a new map, you can also go to menu File > New and open the ISMTBOM 202x Final Draft symbol set.
New 15’000 map: Choose the ISMTBOM 202x Final Draft 15’000.ocd. No symbol scaling needed.
New 12’500 / 10’000: Choose the ISMTBOM 202x Final Draft 15’000.ocd. Choose 12’500 / 10’000 as map scale. Scale symbols.
New 7’500 / 5’000 map: Choose the ISMTBOM 202x Final Draft 5’000.ocd. This symbol set contains additional sprint symbols. Choose 7’500 / 5’000 as map scale. No symbol scaling needed.
Update an old MTBO Map
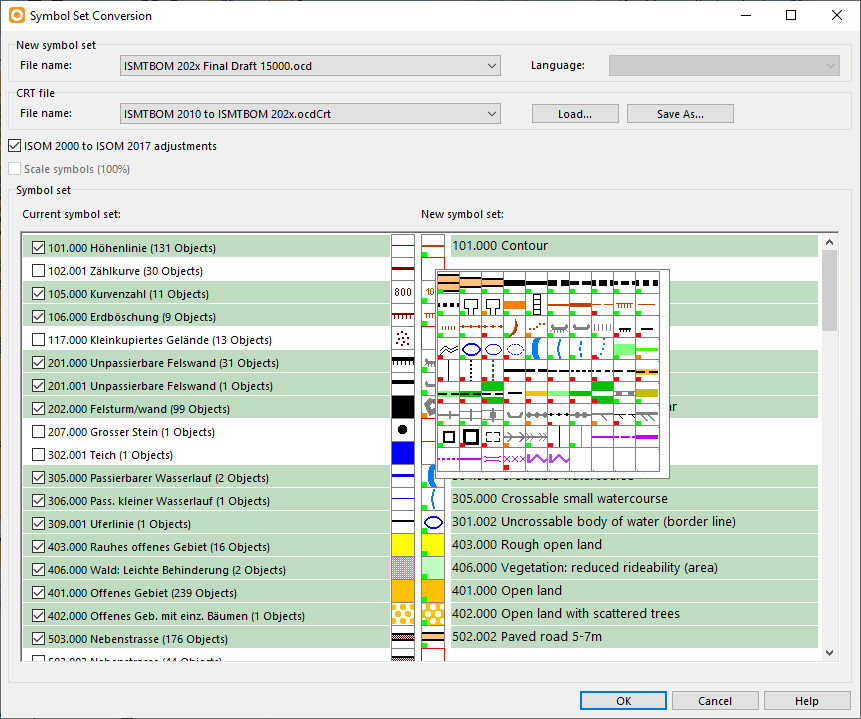
In OCAD, you can use the function Symbol Set Conversion to easily update a MTBO map with an old symbol set to the new symbol set.
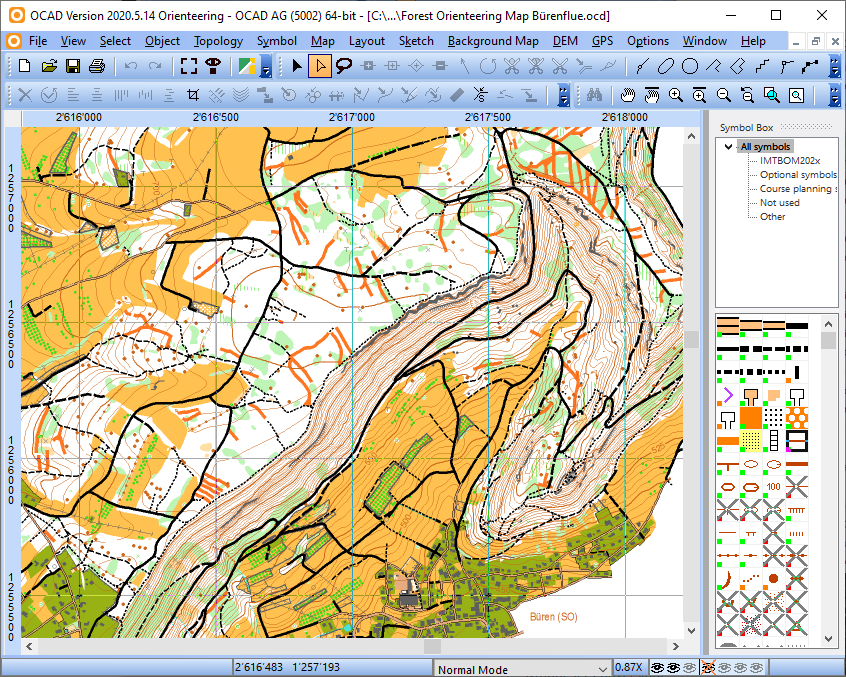
Open an old MTBO map. Apart from ISMTBO2010 symbols, this map example contains additional (own) symbols. Start the Symbol Set Conversion (menu Map > Symbol Set Conversion). Choose the same Symbol Set and CRT file as you see in the image above. Activate the Scale Symbols option if the map scale of both files is different, e.g. you convert an old MTBO map in scale 10’000 to the new ISMTBOM 15’000 symbol set. Have a look at our Wiki page to understand the functionality of the Symbol Set Conversion.Updated map with new MTBO symbol set and some additional symbols on top.
OCAD Sample Map Bürenflue (File > Open Sample Map). Start the Symbol Set Conversion (menu Map > Symbol Set Conversion). Choose the same Symbol Set and CRT file as you see in the image above. Activate the Scale Symbols option if the map scale of both files is different. In our example we convert an old ISOM 2017 map in scale 10’000 and use the ISMTBOM 15’000 symbol set for conversion. But the map scale should still be 10’000 after conversion. That’s why we scale the symbols. Have a look at our Wiki page to understand the functionality of the Symbol Set Conversion. Converted map from ISOM 2017 symbol set to new MTBO symbol set.