Monthly Archives: September 2020

Multi-directional Hillshading

A hillshade is a shaded relief picture of the surface. Important for a hillshade is the position of the imaginary light source, which is taken into account for shading the image.

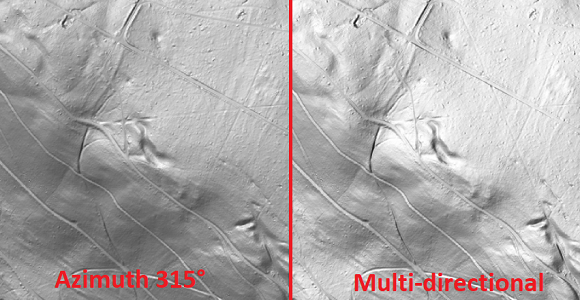
Normally, the direction of the light source is 315° (north-west). Since the Service Update 20.5.3, it’s also possible to choose the option Multi-directional. It is a composite image made up of four images in which the light source comes from different directions. Like this, the terrain is more realistically represented, and overexposed and nonilluminated areas of the map are more balanced.

In OCAD, Hill Shading can be created from the DEM menu or from the DEM Import Wizard.

How to use OCAD and LiDAR to Calculate Climbing for Courses

In order to indicate the climbing for courses, many course setters invest a lot of time to manually add up the climbing along the optimal route. If a terrain model (DEM) is available, this can be done easier with OCAD. With the following workflow, which is also possible in the OCAD Course Setting Edition, the climbing can be calculated automatically to a certain extent:

  1. Start a course setting project, open a background map and draw a course.

2. In your course setting project, go to menu DEM > Open and open your terrain model (* _DTM.ocdDem). This file is generated during the LiDAR processing.

3. Now draw a line with the optimal route from start to finish. This has to be done for each course. Use any line symbol in the symbol box or create a new one.

4. Select one of these optimal routes and go to menu DEM > Create Profile. You will get a Total ascent value, which you can enter into Course Setting > Courses > Climb used.

In the Courses dialogue, there is also a Climb calculated value, which is just calculated automatically by adding the net ascent from each control to the next one. The value that is entered in Climb used will show up in the control description.