OCAD Internet Map: Unterschied zwischen den Versionen
Admin (Diskussion | Beiträge) K (moved OIM – OCAD Internet Map to OCAD Internet Map) |
Admin (Diskussion | Beiträge) |
||
| Zeile 43: | Zeile 43: | ||
====Zoomlevel settings==== | ====Zoomlevel settings==== | ||
'''Relink''' or '''Change''' | '''Relink''' or '''Change''' files of different zoom level. | ||
-> Click '''Next''' | -> Click '''Next''' | ||
====Layout and functionality settings==== | ====Layout and functionality settings==== | ||
Version vom 7. November 2011, 10:07 Uhr
Export OIM
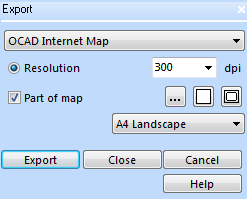
Choose Export OCAD Internet Map from File menu to export the map as OIM (OCAD Internet Map).
With OIM you can publish big OCAD maps on internet. You can insert the OCAD Internet Map to a HTML file.
- Resolution: Enter here the resolution of the GIF (for Java) or JPG (for Flash) file.
- Part of map: Activate this check box to export a part of the map. The map section will be shown with a rectangle on the drawing window. You can alter the rectangle with the mouse.
- Click the button Setup
to define the part of map to be exported by coordinates. The dialog box Setup Part of Map (Export) appears.
- Click the button Entire map
to export the entire map.
- Click the button To current view
to export the currently on the screen displayed map.
- If this check box is not active the entire map will be exported.
![]() It is also possible to choose a defined format like A4 landscape.
It is also possible to choose a defined format like A4 landscape.
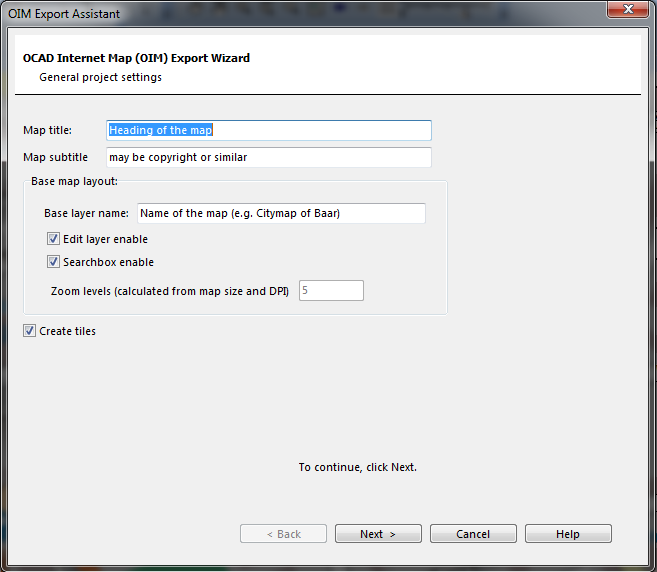
-> Click Export. The OIM Export Assistand dialog box appears:
OIM Export Assistant
General project settings

|
- Map title
- Map subtitle
- Base Map Layout
- Base Layer Name
- Edit layer enable
- Searchbox enable
- Zoom levels, calculated from map size and DPI
- Do not create Tiles
-> Click Next
Zoomlevel settings
Relink or Change files of different zoom level.
-> Click Next
Layout and functionality settings
Controll Options:'
- Show Layer Selector
- Show Overview Map
- Show Coordiantes
- Show Permalink
Color and Size Settings:
- Header Font Color
- Header Background Color
- Subheader Font Color
- Subhead Background Color
- Border Color
- Site Background Color
- Font Size
- Subheader font Size
- Border width
-> Click Next
Points of interrest (POI)
Choose Add, the POI Selector dialog box appears:
- Title
- Dataset
- Condition
- Location field
- Point of Interest Type:
- -Point (Vector)
- -Icon (Information Bubbles)
-> Click Next
Icon Settings:
- Icon
- Icon Offset
- Icon Size
-> Click Next
General Settings
- Short description
- Description
- URL field
- Link name
- Link target
-> Click Finish
Choose direction and Save file. To see the internet map open the *.html file with double click in the browser.
- Zoom range: Enter the zoom range. Normally it is equal to the number of zoom levels.
- Zoom levels: The OCAD Internet Map in Java Applet or Flash consists of GIF or JPG files in different resolution. Enter the number of zoom level. The resolution for the minimum magnification will be set to fit the map in the window. The resolution of the maximum magnification is set according the field Resolution. The resolution in-between will be calculated in a logarithmic interval.
- Do not create tiles: Activate this option if you like to do only changes on the search function or on the hotspots without creating the map files newly.
- Compress SVG: Activate this box to compress the SVG export file.
- Layout: Choose this page to define the layout of the OCAD Internet Map.
- Overview size: On internet map an overview map appears upper right. Enter here the Width and Height of the overview in pixels.
- Border width: Enter here the border width of the internet map in pixels. The default value is 5 pixels.
- Fill color: Click on this button to change the background color. The Color dialog appears.
Maps: Choose this page to choose the maps.
The list shows one line for each zoom level. For each zoom level you can choose a map file to be used for this zoom level. The first line shows the map for the lowest magnification, the last line the map for the highest magnification. If you do not make any change, the actual map is used for all zoom levels. If you want to use different maps for lower magnifications, you can choose here the desired map. To change the map file double click the corresponding line or select the line and click Change. OCAD adjusts the maps using real world coordinates. When creating a special map for the lower magnifications, you should use Change Scale from the Map menu. This guarantees that scale and real world coordinates for the maps are correct.
- Change: Click this button to change the map file for the selected zoom level.
- Find: Choose this page to create a Find function for the Internet map. The Find function lets the user find street names, for example. OCAD will add a find box in the HTML file, where a name can be selected. For more information about calling the functions of the OCAD applet see the demo at
- scriptdemo.
- To add a Find function, the corresponding objects must be linked to a database. See Creating a New Database Table for information on how to create a table and to link the objects.
- External scripting (JavaScript): Activate this box if you want the scripting for the Java applet in the HTML file. Otherwise the scripting functions are in the Java applet.
- Add: Click this button to add a find box or hotspots to the HTML file. The Edit Find/Hotspots dialog box appears.
- Edit: Click this button to edit the selected find box or hotspots. The Edit Find/Hotspots dialog box appears.
- Remove: Click this button to remove the selected find box or hotspots.
- Label for the selected box: Enter here the label for the selected box.
- Label for the find box: Enter here the label for the find box.
Hotspots (This function is only available in OCAD Professional!)
Choose this page to add hotspots to the Internet map. Hotspots appear in programmable shape and color on the map. If the user clicks on a hotspot, the corresponding document will be displayed. OCAD writes the code for the hotspots to the HTML file. This is intended as sample code. You may copy this code to your HTML file and make changes according to your needs. To add hotspots, the corresponding objects must be linked to a database. See Creating a New Database Table for information on how to create a table and to link the objects.
Title Enter here the title for the hotspots and find function. The title appears in OIM map.
- Dataset: Select here the dataset which connects to a table with the URLs (www addresses).
- Condition: Enter here the condition for the find objects.
- Name field: Select here the field in the table which contains the names for the find function.
- Pointer: Choose here the pointer type and the color for the find objects.
Hotspots
- Show hotspots: Activate this box to add hotspots to the Internet map.
- URL field: Select here the field in the table which contains the URL.
- You can add absolute URLs starting with http:, ftp:, file: or mailto: URLs which do not start with one of these prefixes are treated as local addresses. They must be in the same folder as the applet or in a subfolder of it.
Examples:
- http://www.ocad.com
- mydoc.html
- mysubfolder/mysubfolderdoc.html
- Database queries:
- You can create database queries with Prefix and URL field. For example:
- Prefix: http://www.ocad.com/page.php?id=
- URL-ID: database id
- Prefix: Enter here the prefix for all URLs.
- Postfix: Enter here the postfix for all URLs.
- Target: Normally the document will be displayed in a new window. However it is possible to display it in a frame. Enter here the frame name or select one of the following targets:
- - _blank: Open page in new window.
- - _parent: open page in parent window of the frame.
- - _self: Open page in the same window.
- - _top: Open page in top window.
- Hint field: Select here the field in the table which contains the names for the hints.
- Type: Choose here the hotspot symbol type.
- Color: Choose the hotspot color.
- Show in zoom levels: Select here in which zoom levels the hotspot should appear.
Previous Chapter: Server Client
Next Chapter : Workflows
Back to Main Page
