Hintergrundkarte
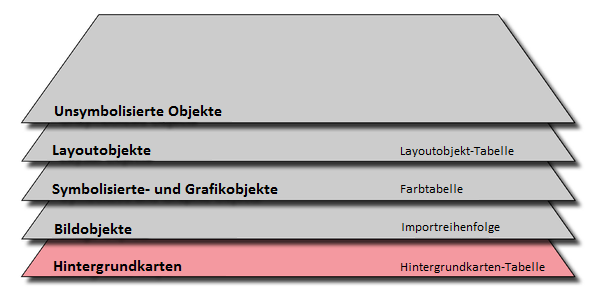
Als Hintergrundkarte wird eine Rasterkarte oder eine OCAD-Datei, die als Hintergrund der aktuellen OCAD-Datei verwendet wird, bezeichnet. Sie dient als Zeichenvorlage oder als Hintergrundkartenbild. Beispiele dafür sind gescannte Kartenskizzen, Satelitenbilder, Orthophotos oder Schummerungen. OCAD kann Hintergrundbilder und -Karten nicht bearbeiten.
Hintergrundkarte scannen 


Folgende zwei Punkte werden Ihnen empfohlen:
- Verwenden Sie ein Gitter: Meistens können Sie nicht die ganze Entwurfskarte scannen. Einschränkungen gibt es von Seiten von Windows (limitiert die maximale Grösse von Hintergrundkarten), durch den vorhandenen Speicherplatz oder durch die Grösse des Scanners (A4). In diesen Fällen, empfehlen wir Ihnen, ein Gitter auf die Entwurfskarte zu zeichnen. In vielen Fällen enthält die Karte bereits ein Kilometer-Gitter, welches Sie verwenden können. Falls dieses nicht existiert, sollten Sie ein präzises Gitter mit horizontalen und vertikalen Linien (mit einem Abstand von ca. 10cm) zeichnen. So können die gescannten Teile in OCAD wieder einfach zusammengefügt werden.
- Auflösung: Wir empfehlen Ihnen die Karte mit 300 dpi zu scannen.
Im Scannen-Submenü des Hintergrundkarte-Menüs finden Sie die folgenden zwei Befehle:
- Scannen: Wählen Sie diesen Befehl, um den Scannvorgang zu starten. Dieser Befehl wird Ihnen das Hauptfenster des TWAIN-Treibers Ihres Scanners anzeigen. Nach dem Scannen, können Sie einen Dateinamen für die gescannte Karte eingeben. Danach wird die gescannte Hintergrundkarte geöffnet.
- Quelle wählen: Wenn mehrere TWAIN-Quellen (oder mehrere Treiber) installiert sind, können Sie hier die gewünschte Quelle wählen.
Um eine Karte mit OCAD zu scannen müssen Sie die folgenden Voraussetzungen erfüllen:
Ein Scanner muss an Ihrem PC angeschlossen sein und ein 32-bit TWAIN-Treiber muss installiert sein.
Wenn Sie kein TWAIN-Treiber besitzen oder den Scanner an einem anderen PC verwenden, verwenden Sie die Software des Scanners und speichern Sie die gescannte Hintergrundkarte als BMP-, GIF-, JPEG- oder TIFF-Datei. Wählen Sie Öffnen aus dem Hintergrundkarte-Menü, um die gescannte Karte in OCAD zu öffnen.
Wählen Sie Abstimmen aus dem Hintergrundkarte-Menü, um die Hintergrundkarte dem Gitter oder einem bereits vorhanden Kartenteil anzupassen.
Hintergrundkarte öffnen 


Wählen Sie diesen Befehl aus dem Hintergrundkarte-Menü, um eine Hintergrundkarte, welche als Hintergrundbild im Zeichnungsfenster angezeigt werden soll, zu öffnen. OCAD kann BMP-, GIF-, TIFF- und JPEG-Dateien öffnen. Ausserdem können OCAD-Karten (*.ocd) oder Verschlüsselte OCAD-Dateien (*.eocd) als Hintergrundkarte geladen werden. Der Dialog Hintergrundkarte öffnen erscheint. Wählen Sie eine Datei und wählen Sie Öffnen.
Beachten Sie: In der OCAD 11 Starter Edition, können OCAD-Karten (*.ocd) und Verschlüsselte OCAD-Dateien (*.eocd) nur als Hintergrundkarte von Bahnlegungsprojekten geladen werden.
Eine georeferenzierte Rasterkarte als Hintergrundkarte verwenden
Wenn Ihre Karte georeferenziert ist und Sie eine georeferenzierte Karte als Hintergrundkarte verwenden möchten:
- Wählen Sie Öffnen im Hintergrundkarte-Menü. Der Dialog Hintergrundkarte öffnen erscheint.
- Wählen Sie eine Datei und wählen Sie Öffnen.
Die georeferenzierte Karte wird dann sofort im selektierten Koordinatensystem korrekt platziert. Sie können die nächsten Schritte überspringen und gleich mit Zeichnen anfangen.
![]() - Wählen Sie die Schaltfläche Ganze Karte, um die ganze Karte anzuzeigen.
- Wählen Sie die Schaltfläche Ganze Karte, um die ganze Karte anzuzeigen.
- - Die Option Entwurfsmodus im Ansicht-Menü, kann benutzt werden, um Kartenobjekte oder die Hintergrundkarte zu dimmen.
- - OCAD-Dateien können ebenfalls als Hintergrundkarten geladen werden.
Eine nicht-georeferenzierte Rasterkarte als Hintergrundkarte verwenden
Wenn Ihre Karte georeferenziert ist und Sie eine nicht-georeferenzierte Karte als Hintergrundkarte laden möchten:
- Wählen Sie Öffnen im Hintergrundkarte-Menü. Der Dialog Hintergrundkarte öffnen erscheint.
- Wählen Sie eine Datei und wählen Sie Öffnen.
- Geben Sie eine Auflösung für die Hintergrundkarte ein und wählen Sie OK.
Die Hintergrundkarte wird in der Mitte der aktuellen Zeichnungsfläche abgebildet. Die Rasterkarte (Hintergrundkarte) muss nun mit der Funktion Hintergrundkarte abstimmen platziert werden.
![]() Sie können eine Rasterkarte direkt in OCAD scannen, um diese als Hintergrundkarte zu verwenden: Wählen Sie Scannen aus dem Hintergrundkarte-Menü und wählen Sie Scannen aus dem Submenü. Die Dialogbox Ihres Scanners wird erscheinen (Hintergrundkarte scannen).
Sie können eine Rasterkarte direkt in OCAD scannen, um diese als Hintergrundkarte zu verwenden: Wählen Sie Scannen aus dem Hintergrundkarte-Menü und wählen Sie Scannen aus dem Submenü. Die Dialogbox Ihres Scanners wird erscheinen (Hintergrundkarte scannen).
Warnungen und Fehlermeldungen
Nicht genügend Speicher für Hintergrundkarte
Diese Fehlermeldung erscheint, wenn Windows nicht genug Speicherplatz für das Laden der Hintergrundkarte aufbringen kann. Unkomprimierte Hintergrundkarten benötigen ungefähr den Speicherplatz der Dateigrösse. Komprimierte Hintergrundkarten müssen vergrössert werden und benötigen daher mehr Speicherplatz als Ihre tatsächliche Grösse.
TIFF-Variante wird nicht unterstützt
Diese Fehlermeldung wird Ihnen angezeigt, wenn das TIFF-Format nicht von der aktuellen OCAD-Version unterstützt wird.
Komprimierungstyp wird nicht unterstützt
Diese Fehlermeldung wird Ihnen angezeigt, wenn die Komprimierung der geöffneten TIFF-Datei nicht von der aktuellen OCAD-Version unterstützt wird.
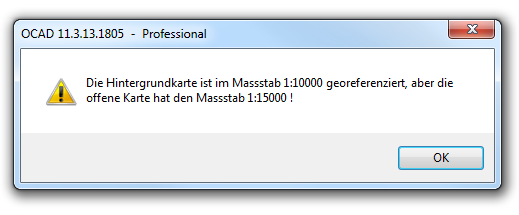
Die Hintergrundkarte ist im Massstab 1:x georeferenziert, aber die offene Karte hat den Massstab 1:y
Diese Warnung erscheint, wenn die OCAD-Hintergrundkarte georeferenziert ist und einen anderen Massstab aufweist, wie die aktuell geöffnete Karte. OCAD öffnet die Karte, ignoriert jedoch die Georeferenzierung (keine Skalierung, keine Verschiebung) und verwendet Papierkoordinaten.
Um diese Warnung zu verhindern, öffnen Sie die OCAD-Datei, die Sie als Hintergrundkarte laden möchten und wählen die Funktion Massstab ändern.
Einschränkungen für georeferenzierte OCAD-Hintergrundkarten
OCAD unterstützt verschiedene Koordinatensystem-Verschieubungen und Koordinatensystem-Winkel. Verschiebung und Winkel können im Dialog Massstab und Koordinatensystem eingestellt werden. Manchmal hat OCAD kleinere Probleme mit verschiedenen Koordinatensystem-Winkel.
Hintergrundkarte abstimmen 


Wählen Sie diesen Befehl im Hintergrundkarte-Menü oder drücken Sie F9 (Standart-Shortcut), um die Hintergrundkarte abzustimmen.
Sie können diesen Befehl nutzen, wenn eine oder mehrere Raster-Hintergrundkarten geladen sind.
Wenn mehr als eine Hintergrundkarte geladen ist, müssen Sie die entsprechende Karte in der Dialogbox auswählen.
Eine Hintergrundkarte kann dem Gitter oder der Karte angepasst werden. Ein Gitter auf der Hintergrundkarte erleichtert den Abstimmungsprozess. Kreuzungen von Gitterlinien eignen sich am besten für die Anpassung. Sie können jedoch auch irgend einen anderen Punkt für die Abstimmung benutzen.
Sie können zwischen 1 und 12 Punkte für eine Abstimmung bestimmen. Nachdem Sie den Befehl Abstimmen ausgeführt haben, wechselt der Mauszeiger zu einem Fadenkreuz mit einem Schwarz-Weiss-Mustericon. Sie befinden sich nun im Abstimmungs-Modus. Führen Sie die folgenden Punkte für jeden Abstimmungspunkt durch:
- Klicken Sie an einen Punkt auf der Hintergrundkarte
- Klicken Sie an denselben Standort in der OCAD-Karte.
Auf der linken Seite der Statusleiste können Sie jeweils sehen, welches Punkt Sie im Moment im Abstimmungsmodus wählen müssen.
Wenn Sie genügend Abstimmungspunkte gewählt haben, führen Sie die Abstimmung mit der Enter-Taste durch. Die Hintergrundkarte wird entsprechend den Abstimmungspunkten gedreht und gestreckt.
![]() - If the size of the raster map corresponds exactly with that of the map scale and has not been rotated, it is possible to adjust it with the map using a single point pair. OCAD will correctly reposition the raster map without changing the scale or angle.
- If the size of the raster map corresponds exactly with that of the map scale and has not been rotated, it is possible to adjust it with the map using a single point pair. OCAD will correctly reposition the raster map without changing the scale or angle.
- - If the raster map is contorted, rescaled or rotated, you will need to use between 3 and 12 point pairs to adjust the image with the map. OCAD repositions the raster map by transforming it (affine transformation) and adjusts the scale and angle accordingly. The point pairs should be distributed equally across the map.
- - If the adjustment point pairs lie outside of the drawing window, you can move the map section between the adjustment point pairs during the adjustment process.
Error Adjustment points too close: When using several points for adjusting a background map, the outermost points must be separated by at least 2 mm on the background map.
Note: OCAD Background Maps cannot be adjusted. The Georeferenzierung is used to place the map or, if the map is not georeferenced, the origin of the background map (middle of the map, point (0/0)) is displayed on the origin of the current map.
Once you have completed the map adjustment, the raster map can be saved as a georeferenced raster map. The advantage of this is that the raster map will be loaded in the correct position the next time it is opened.
To save the raster map as a georeferenced raster map:
- Select the Export command in the File menu.
- Select a desired raster format (TIF, JPG, GIF or BMP)
- Select a Resolution (300 dpi is recommended for printing maps)
- Select the Create World file option
- Click the OK button.
Alle Hintergrundkarten verbergen 


Choose the Hide All command in the Background Map menu or press the F10 key (Shortcut by default) to hide all background maps temporarily or make them visible when they are hidden. This command is active if one or more background maps are loaded.
If you want to hide only single background maps, choose the Verwalten command from the Background Map menu.
Hintergrundkarten verwalten 


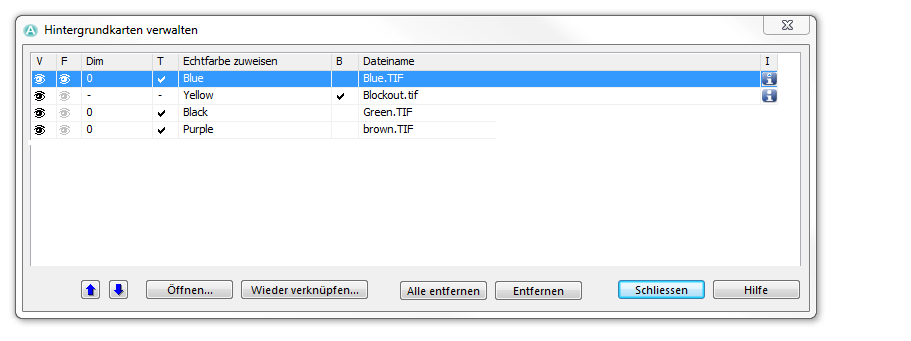
Choose the Manage command from the Background Map menu to set options for displaying and printing the background maps. The Manage Background Map dialog box is displayed. This is a non-modal dialog box. It is possible to switch between the dialog box and the map window without closing the dialog. Changes are directly updated on the map.
In the Manage Background Map dialog a table is displayed. In this table all loaded background maps are listed. The table consists of the following columns:
Sichtbarkeitseigenschaften 


- V (Visible): You can make a background map visible or hide it by clicking the corresponding cell in this column. An eye icon in this column means that the background map is visible.
 To hide all background maps temporary use the Alle verbergen command in the Background Map menu.
- F (Visible in Background Favorites view mode): You can make a background map visible or hide it in the Hintergrundkarten-Favoriten by clicking the corresponding cell in this column. An eye icon in this column means that the background map is visible in the Hintergrundkarten-Favoriten.
- Dim: In this column you can enter a value in percentage to make the background map appear brighter, i.e. to dim it. 0% means the background map is displayed in its original colors. 100% means the background map appears completely white. Dimming is used to get a better distinction between the background map and the map.
- T (Transparent): If more than one background map is opened you can set them transparent so that both are visible. Activate this option by clicking the corresponding cell in this column.
Echtfarbe zuweisen 


This feature is used in a special production process, namely to update old hand drawn or scribed maps. The printing plates for each spot color are scanned (black and white or gray-scale) and then used as background maps. When such a background map is assigned to a spot color, it is displayed with this color. In addition, when the Echtfarben-Ansicht is activated the background map is displayed together with the corresponding spot color.
Visit the Echtfarben definieren page to learn more about spot colors.
Note: This feature is intended for black and white or gray-scale background maps. If a color background map is assigned, the resulting colors are undefined.
Blockout 


This column is labeled with a B and is only available for raster background maps. Click a cell in the Blockout column to use the corresponding background map as a block out mask.
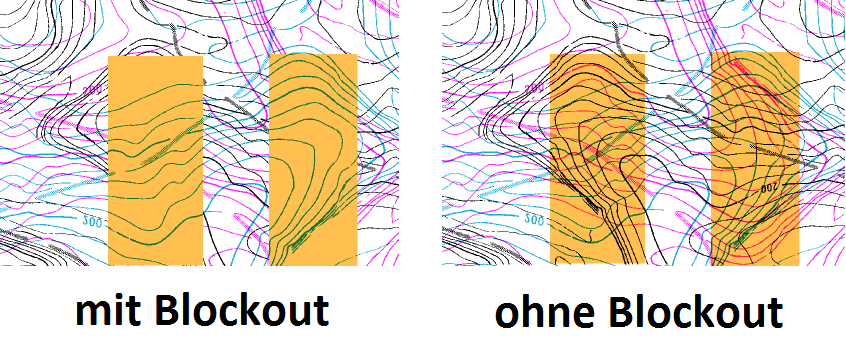
If you have several black and white or gray-scale background maps which are transparent and assigned to a spot color, you can use this function to hide some background maps in a certain area of a different background map.
In the following example, there are four black and white or grey-scale background maps loaded. Each background map was assigned to a spot color. There are the purple, the black and the blue lines. The fourth background map was assigned to the yellow color. The Hintergrundkarten verwalten dialog looks as follows:
The yellow background map is used as a Blockout mask. The result looks as follows.
The black and the purple background maps are hidden behind the yellow areas when using Blockout. The blue background map is drawn over the yellow areas because it is over the blockout mask in the order of the background maps.
Dateiname 


The file name of the background map is displayed in the File name column.
I (Dokument-Info) 


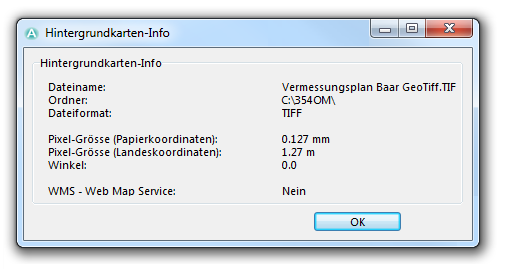
Click on the ![]() information icon to get more information about the corresponding raster background map. The Background Map Info dialog box appears with additional information. The given information varies depending on the file type.
information icon to get more information about the corresponding raster background map. The Background Map Info dialog box appears with additional information. The given information varies depending on the file type.
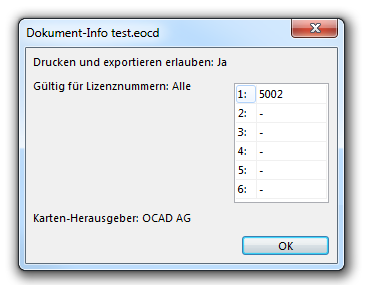
If an encrypted background map is load then a ![]() lock icon is displayed in the information column.
lock icon is displayed in the information column.
Click on the ![]() lock icon to get more information about the encrypted background map.
lock icon to get more information about the encrypted background map.
Weitere Funktionen 


- Move Up: Click the Move Up icon to move the selected background map one line upwards. Background maps which are listed in a upper position in the Manage Background Map table are diplayed in the foreground.
- Move Down: Click the Move Down icon to move the selected background map one line downwards. Background maps which are listed in a lower position in the Manage Background Map table are diplayed in the background.
- Open: Click this button to open a new background map (neue Hintergrundkarte öffnen).
- Relink: Wieder verknüpfen background maps to another directory.
- Remove all: Click this button to remove all background maps. This command does not delete the background map files.
- Remove: Click this button to remove the selected background map. This command does not delete the background map file.
- Close: Click the close button to quit the dialog.
WMS - Web Map Service 

Visit the Web Map Service page to get some information about this function.
Previous Chapter: Create a New Symbol
Next Chapter: Import Files
Back to Main Page
