Client Server Architecture: Unterschied zwischen den Versionen
Admin (Diskussion | Beiträge) |
Admin (Diskussion | Beiträge) |
||
| Zeile 38: | Zeile 38: | ||
==Create new Project== | ==Create new Project== | ||
After the basic setup you can create a new map project in the database. To do so click in | |||
the connection window on new project. The following information have to be provided for | |||
the project creation. | |||
[[File:ServerClient_CreateNewProject.PNG]] | |||
As shown in Illustration 2 a project name and a unique project ident must be supplied. | |||
When you enter a project name a project ident will be created of the name by default but | |||
you can change it the way you like. A map scale and a grid distance should be provided all | |||
other parameters are optional. When clicking on the create button the new project will be | |||
created and should shown up in the database window. | |||
==Get Objects from Current View== | ==Get Objects from Current View== | ||
Version vom 1. Dezember 2011, 15:47 Uhr
Introduction
This manual is written during the development of OCAD server module. All the features in the manner described here are subject to change. The manual reflects the functionality of the current implementation and how to work with it. This is not a final implementation an my have bugs and functionality faults. The current state is mostly tested with Postgres SQL – Server 8.2.9 and should work with the version mentioned before or higher. Working with an Oracle database is not yet supported, this will be a step for the future.
Installation of the Database
To be able to use the OCAD-Server Module you have to install a Postgres SQL – Server. The version used for development was 8.2.9. You can get Postgres from http://www.postgres.org. The module was developed with a Postgres Server on a Windows platform. To work with the server module you have to create a user called ocad11 – this is currently hard coded. As next step you must setup 6 core tables and 3 sequences for the module and alter the ocad11 user to them.
TODO
Connect Disconnect
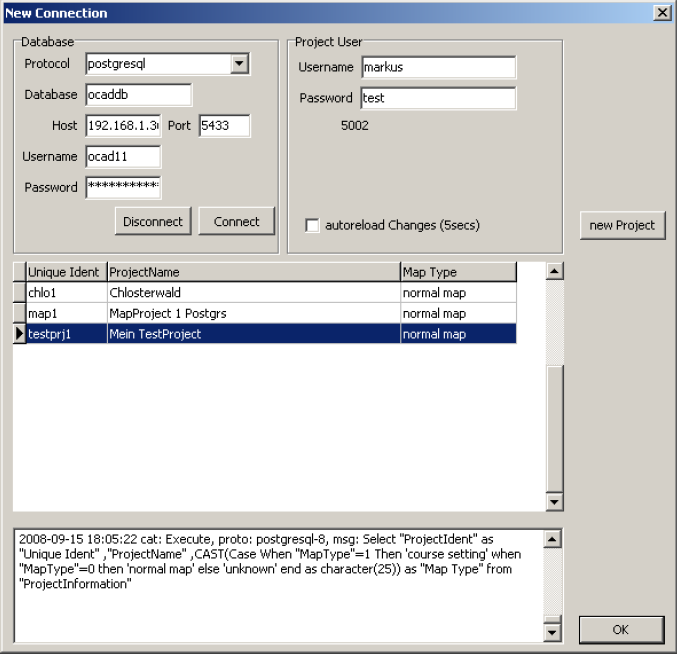
After the basic database setup you can connect to the database. You have to enter the information in the below shown mask.
For the first connection you have to provide the database protocol – currently only Postgres is supported. For a connection although the host, the database name, the port and the port must be provided. The user name for the database currently must be ocad11 as mentioned in the setup selection and a Password.
For the project user you must provide the data as inserted during the installation for the user name and the password. When you are connected the currently database projects get loaded and your userident (e.g. Illustration 1: connection and project settings the userident is 5002). In the current development stage none of the provided settings are saved! The hard coded default settings shown above. The database password is ocaddb.
The “auto reload changes” re-fetches all loaded objects when they changed in the db.
Create new Project
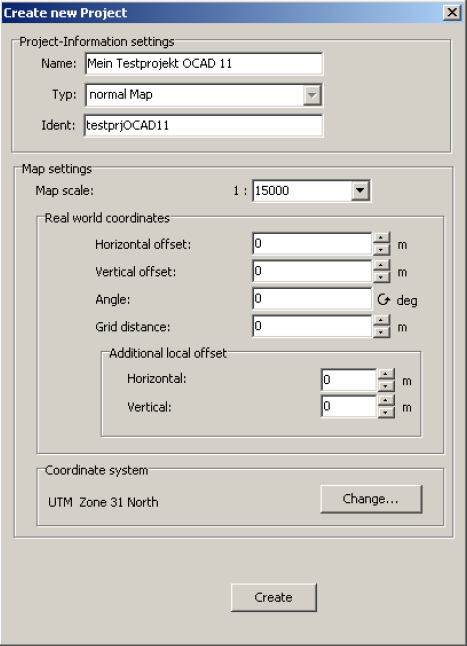
After the basic setup you can create a new map project in the database. To do so click in the connection window on new project. The following information have to be provided for the project creation.
As shown in Illustration 2 a project name and a unique project ident must be supplied. When you enter a project name a project ident will be created of the name by default but you can change it the way you like. A map scale and a grid distance should be provided all other parameters are optional. When clicking on the create button the new project will be created and should shown up in the database window.
Get Objects from Current View
ToDo
Import a Map from the Connected Server
ToDo
Delete Object in Database
ToDo
Check Out Selected Objects
ToDo
Check in Selected Objects
ToDo
Show Checked Out Objects
ToDo
Database Undo
ToDo
Database Redo
ToDo
Generate Map Preview
ToDo
Do Database Maintenance
ToDo
Manage Server Bookmarks
ToDo
Show Project Information
ToDo
Previous Chapter: Course Setting for Orienteering
Next Chapter: OCAD Internet Map
Back to Main Page

