Ruler Guides: Difference between revisions
No edit summary |
No edit summary |
||
| Line 11: | Line 11: | ||
In both ways, click the '''Add''' button in the '''New ruler guide''' field to place the ruler guide.<br /> | In both ways, click the '''Add''' button in the '''New ruler guide''' field to place the ruler guide.<br /> | ||
<br /> | <br /> | ||
In the '''Default size''' field of the '''Ruler Guides''' dialog you can place ruler guides with predefined dimensions (This is helpful if you want for example draw a map in DIN A4 landscape size.) Select a size from the dropdown list and click the '''Add''' button to place ruler guides in the chosen format.<br /> | In the '''Default size''' field of the '''Ruler Guides''' dialog you can place ruler guides with predefined dimensions (This is helpful if you want for example draw and [[Printing Maps|print]] a map in DIN A4 landscape size.) Select a size from the dropdown list and click the '''Add''' button to place ruler guides in the chosen format. Note: The [[Show Rulers|ruler's]] origin has to be set in the upper left corner of the map. <br /> | ||
<br /> | <br /> | ||
In the '''Existing ruler guides''' field in the '''Ruler Guides''' dialog you can see an overview of existing ruler guides. Select one and click on the '''Delete''' button to delete the corresponding ruler guide. | In the '''Existing ruler guides''' field in the '''Ruler Guides''' dialog you can see an overview of existing ruler guides. Select one and click on the '''Delete''' button to delete the corresponding ruler guide. | ||
Revision as of 14:14, 2 May 2012
Enable the Rulers in the View menu. Enable Show in the Ruler Guides submenu located in the View menu to display all ruler guides in the drawing area.
You have two options to place a ruler guide:
- Drag from the horizontal ruler to the drawing area to create a horizontal guide or drag from the vertical ruler to the drawing area to create a vertical guide. The Show menu item in the Ruler Guides submenu located in the View menu must be enabled to place ruler guides in this way.
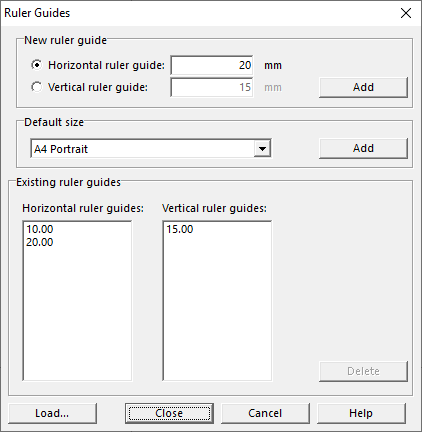
- Choose Ruler Guides and then Manage in the View menu.
In both cases the Ruler Guide dialog appears.

If you dragged the ruler guides to the drawing area the corresponding position (in mm) is shown in the New ruler guide field. If you have chosen the second way to place ruler guides, enter there either a value (in mm) for a horizontal or a value for a vertical ruler guide.
In both ways, click the Add button in the New ruler guide field to place the ruler guide.
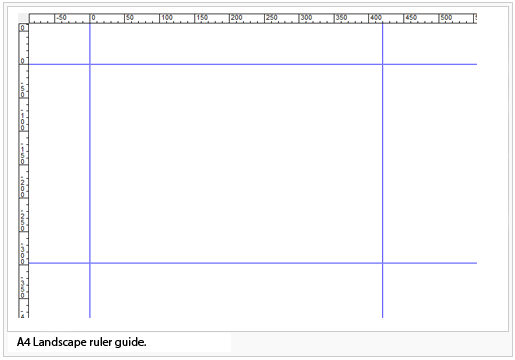
In the Default size field of the Ruler Guides dialog you can place ruler guides with predefined dimensions (This is helpful if you want for example draw and print a map in DIN A4 landscape size.) Select a size from the dropdown list and click the Add button to place ruler guides in the chosen format. Note: The ruler's origin has to be set in the upper left corner of the map.
In the Existing ruler guides field in the Ruler Guides dialog you can see an overview of existing ruler guides. Select one and click on the Delete button to delete the corresponding ruler guide.
Click on Close to close the Ruler Guides dialog box and apply all changes.
Click on Cancel to close the Ruler Guides dialog without saving any changes.
![]() Read more about customizing the Rulers.
Read more about customizing the Rulers.
Create ruler guide for printing artwork
- Change a ruler’s zero origin (upper left corner of the paper).
- Open ruler guide dialog box.
- Costumize default size -> Add.
- Close dialog box.
- Choose Print from File menu.
- Change Print map size- Part of Map selection rectangle in matching size.
- Press Print button.
