A GeoPackage (GPKG) is a data format for geographic information system implemented as a SQLite database container.
With the latest Update, it is now possible in OCAD in a test version to import point, linestring and polygons from GeoPackage. We are grateful for feedback.
The abundance of very precise data partly leads to the fact that orienteering maps become more detailed, whereby the readability of the maps may suffer.
In OCAD, it is now possible to check directly during drawing whether the drawn line or area object corresponds to the minimum dimension of the IOF. In the lower left corner of the screen, an indication appears whether the object has already fulfilled the minimum dimension or not. If this is the case, the indication appears green. If not, the indication appears red. In this case, an additional percentage indication shows by how much the object is too small.
Go to the OCAD Preferences > Drawing and Editing > Legibility to activate this function.
Of course, there are always justified reasons to ignore the minimum dimensions. Nevertheless, this tool sensitizes you to draw objects large enough or to omit them for the sake of readability.
Together with the already available legibility halo, which reminds the user to leave enough space between adjacent objects, OCAD offers best support directly during drawing for well readable orienteering maps .
Reminder: Another tool to check the readability of orienteering maps is theCheck Legibilityfunction. This function also veryfies minimum distances between objects, minimum length of line objects or minimum size of area objects according to ISOM 2017. This tool can also be used by Event Advisers and Map Consultants that need to check a map.
On the subject of map printing, we repeatedly receive support requests such as:
Why do the colors of the printed map look different than on the screen?
Why is the export area slightly different from the print area?
How should we print maps?
High time for a blog entry!
Why do the colors of the printed map look different than on the screen?
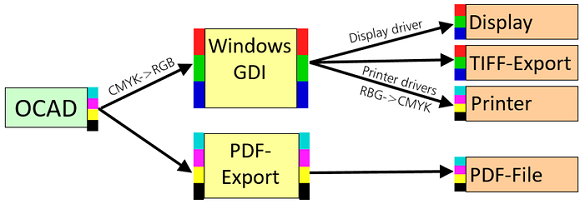
OCAD works with CMYK colors. But what you see on your computer screen are RGB-colors from the Windows Graphics Device Interface (GDI). When you print maps directly out of OCAD, OCAD converts the CMYK values first in RGB values and sends the data to the printer and your printer driver converts the data back to CMYK values. Also, each printer driver may handle the conversion in a different way.
This way it may come to changes in the color values. Therefore, we recommend you to always create a PDF first out of OCAD and print this PDF afterwards.
Color display in OCAD
Why is the export area slightly different from the print area?
When exporting a PDF in A4 Portrait format, the size is always 210 x 297 mm. However, your home printer will not be able to print the full size, as he needs some ’empty borders’ to guide the paper through the printer. How much this is exactly differs from printer to printer. Typically this is 2 – 5 mm.
Because of that, export area and printing area of the same format can differ, as you can see in the picture below.
Side note: In professional printing, maps are printed on ‘oversize’ paper, which is slightly bigger than A4/A3 format and so-called bleed and trim marks are added. After the printing, the maps are cut to the exact size.
How should we print maps?
When printing maps at home, make sure that your layout is a bit smaller that the A4 default sizes. For professional printing, this is not necessary,see side note above.
In OCAD, go to menu File > Export to export your map or your orienteering course as a PDF. You need to be in Normal mode (Menu View > Normal mode) to export PDF files.
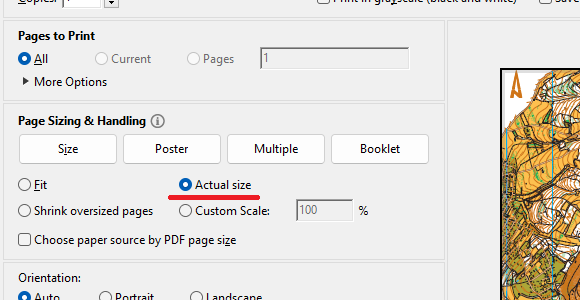
Open the PDF with Adobe Acrobat Reader, as the Acrobat Reader supports the printing process very well.
When printing the PDF, choose ‘Actual size’ and not ‘Fit’. The option ‘Fit (to paper)’ would scale the map and result in wrong map scale.
OCAD licenses can be purchased as Single User or Team licenses.
What is the difference? How can the licenses be used?
Single User license
Single User licenses are suitable for individual users who want to work on multiple devices.
The user of a Single User license can install the software on 1 device by default. In order to allow the use on several own devices at the same time (e.g. desktop pc, laptop, tablet for field work), further activations for own devices will be granted by OCAD on request. Please contact info@ocad.com in this case.
Team license
Team licenses are suitable for clubs and organizations where many users work with OCAD.
Unlike Single User licenses, a Team license can only be activated on one device at a time, but the users can transfer their license immediately and at any time to another person.