Two events are taking place this week in which OCAD reports on news and newly added functions. Both events can be followed online via Microsoft Teams.
– British Orienteering Development Conference Thursday, 18.01.2024 | 20:00 – 21:30 Swiss time (UTC+1) English language. More information and registration.
– Swiss Orienteering Mapping Conference (Kärtelertagung) Saturday, 20.01.2024 | 13:30-17:00 Swiss time (UTC+1 ) German language. More information and registration (deadline 17.01.2024) In the morning, OCAD offers an OCAD Sketch App workshop, which can not be followed online.
We hope you all had a good start to the new year and wish you all the best for 2024.
In this blog post, we take a look at what has been added to OCAD over the last year in terms of functionality and learning aids.
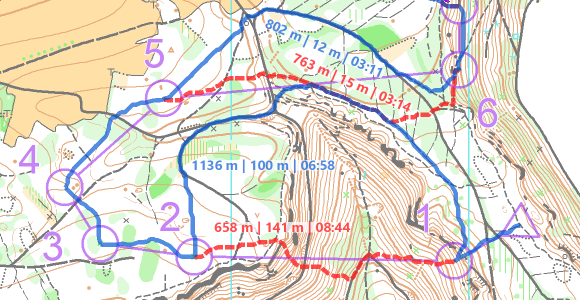
OCAD Route Analyzer 2.0
The Route Analyzer 2.0 now also takes into account the relief and the runnability. With it, the fastest routes can be calculated in urban as well as in classic forest terrain.
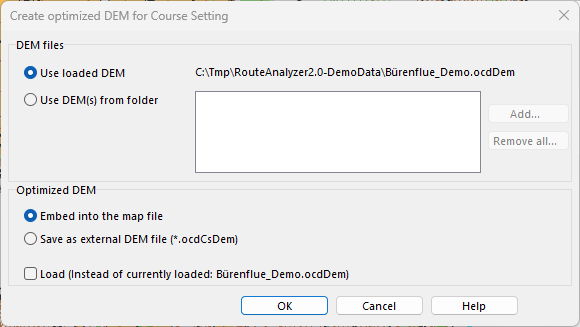
Optimized DEM for Course Setting Available
To ensures that the climbing and slope gradient are included in the route calculation of Route Analyzer 2.0, an optimized elevation model can be embedded directly into the map or course setting file. This significantly reduces the file size of the DEM and makes it easier to exchange.
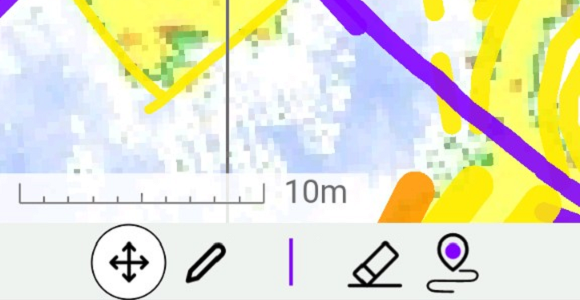
OCAD Sketch App Improvements
Improvements have also been made to the OCAD Sketch App: – A scale bar to improve the distance feeling within the app – Additional colors for sketching – Improved position display of the internal GPS on Android devices
The OCAD Basics exercise teaches both basic and advanced drawing and editing functions in an interactive way. Many tips and tricks for working efficiently with OCAD are also presented.
The exercise file is therefore not only suitable for beginners, but also for experienced users who want to refresh their OCAD knowledge.
It can be found in the OCAD program under Menu File > Open Sample Maps in English, Swedish or German (OCAD Basics_EN.ocd, OCAD Basics_SE.ocd or OCAD Basics_DE.ocd).
If the files are not visible, please download the latest OCAD Update.
The specifications for the control descriptions have been slightly adapted by the International Orienteering Federation IOF and published as ISCD 2024.
The new symbol sets are valid from 1 January 2024 and are already available in OCAD (Menu File > New > Course Setting project for orienteering).
The most important changes:
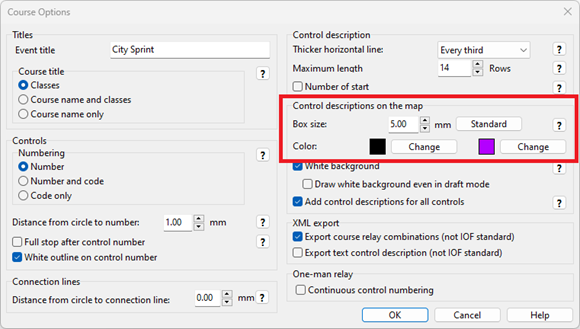
Color of the control description on map now black by default (optionally still purple, see the Course Setting Options).
According to IOF, control description sheet on map should be printed in black. New symbols for map filp and railway are shown.You can change the color of the control description in the Course Setting Options either to black or purple.
New symbol added for a map flip (turn the map over).
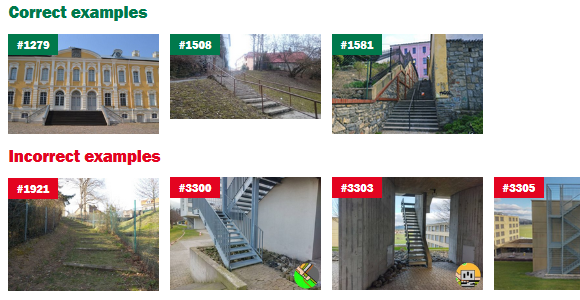
In this article we present different ways of drawing stairs in OCAD and what to look out for.
If stairs are drawn too small or too narrow, this greatly impairs legibility and the staircase can easily be mistaken for an impassable object (especially if the print quality of the circles is poor).
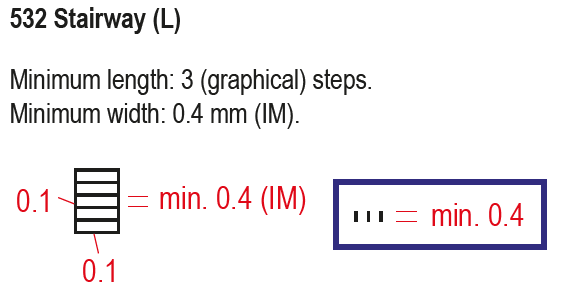
How is the stairway symbol defined?
Steps of a stairway shall be represented in a generalized manner. Contour lines shall be cut out for better legibility, if they touch stairways.
This means that when you are drawing stairs you should make sure that…
(1) treads are not drawn with too little spacing (min. 0.4mm)
(2) contour lines are cut out
(3) stairs are not drawn too narrow (min. 0.4mm)
(4) more than 2 steps are drawn (min. 3)
By the way: In addition to the symbol definition, the IOF O Map Wiki also contains images with correct and incorrect examples.
Draw steps individually or use stairway symbol
There are basically two ways to draw steps:
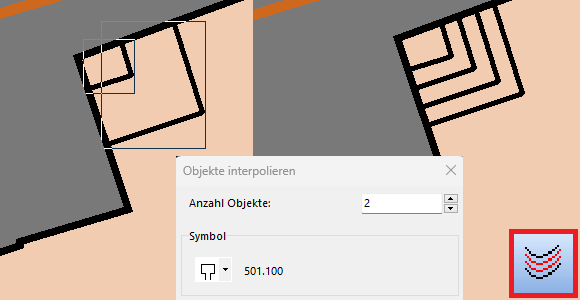
Use the symbol Step or edge of paved area (symbol 501.100) to draw steps individually
Use the symbol Stairway (symbol 532.00) to use a predefined stair width.
Use stairway symbol
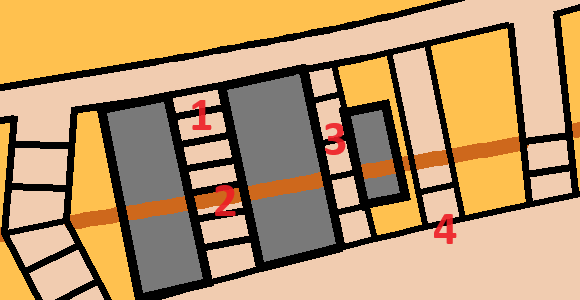
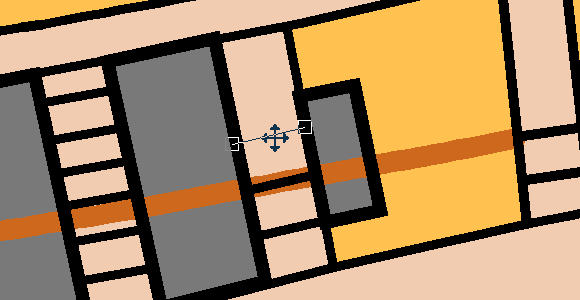
The stairway symbol is suitable for straight staircases. The minimum width and tread width comply with the IOF specifications. The stair filling (colour. 44 Brown 30% – stairs) covers the contour lines, so no cutting of contour lines is needed. Problems arise with curved staircases (2) or staircases with varying widths. Often the predefined width does not fit and leads, for example, to thick edges (3). In such a case, the predefined stair symbols can be duplicated and the width changed afterwards. The whole width of the staircase should be visible and if not, building, walls, etc., should be reduced in size (4). When drawing, it is also important to note that the beginning and end of the stairs (1) must be examined and edited if necessary.
Draw steps individually
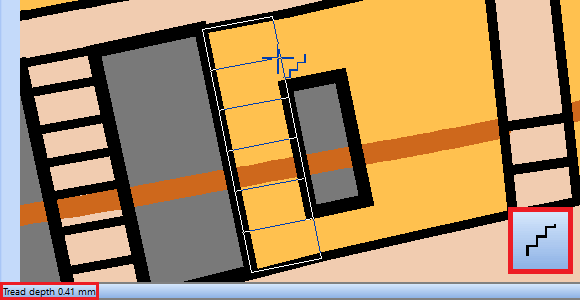
You get the most flexibility when you draw steps individually. For that, you can use the symbol Step or edge of paved area (symbol 501.100).
With the Stairway mode you can easily specify length, width and now also the tread depth (step distance). This is displayed at the bottom left of the status bar.
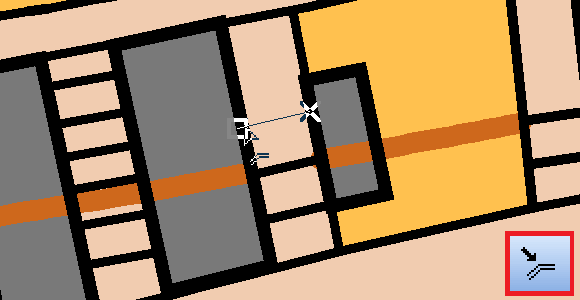
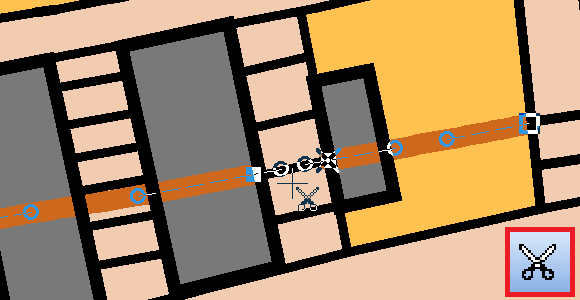
Individual steps can be copied (Ctrl + C), pasted (Ctrl + V) and moved to the correct position with the mouse or arrow key.