OCAD 11 offers a new function for importing complete OCAD map files into OCAD course setting projects. This function has great advantages for MTB Orienteering and Ski Orienteering course setting as it allows respecting the colour hierarchy. The lower purple (e.g. for control circles, lines between controls) appears in the course setting project and on printed maps below paths, tracks and streets. The upper purple (e.g. for focus points of controls, control number, forbidden routes) appears above the paths, tracks and streets.
The following example shows how to import a MTBO map into a course setting project.
General information about the new function
Copying complete maps into OCAD course setting projects has already been possible with earlier OCAD versions. But it required a manual copy-paste-procedure with limitations concerning the quantity of copied objects. With the OCAD 11 function importing is getting much more user friendly. Even though certain know-how about colour hierarchies is still needed in case the colours of the original OCAD templates for MTBO maps have been modified.
Importing map with modified colour hierarchies
Often, the colour hierarchies (= colour table) of your MTBO map and your OCAD course setting project are not identical. So we recommand the following procedure for the import:
- Open a new course setting project:
(Make sure the scale chosen for the course setting project corresponds to the scale of the map you want to import. The scale of your map can be checked in Menu: Map > Set scale and coordinate system …) - Delete all colours in the colour table of the course setting project that are not needed for the course setting:
– Display the colour hierarchy of your MTBO map: Menu: Map > Colors…
– Delete all colours that are not used for the course setting symbols by clicking the Button “Delete unused”.
After deleting the non-used colours your colour table should show the following picture:

- Import your OCAD map into the OCAD course setting project:
– Menu: File > Import Select the map file you want to import.
– This dialogue window will pop up. It is recommended to set the parameters as following:
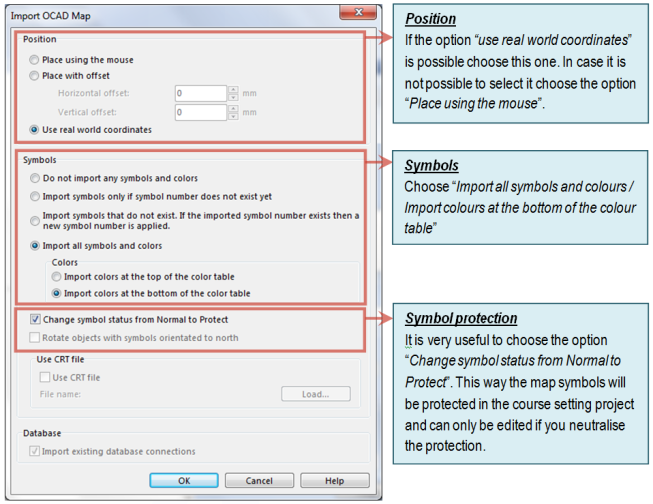
– Press OK. - Adjusting the colour hierarchy:
The map and all its symbols and colours have been imported. The four initial colours of the course setting symbols are on top. To respect the colour hierarchy foreseen by ISMTBOM 2010 the different layers of purple have to be put at the right places.- Display the colour hierarchy of your course setting project: Menu: Map > Colors…
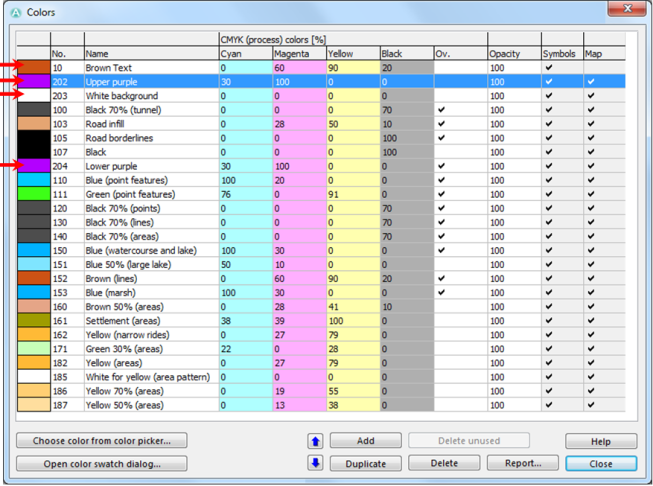
– Adjust the order of the colours in the colour table:
– The first 3 colours (10-Brown Text, 202-Upper purple, 203-White background) stay at the top of the list.
– The colour “204-Lower purple” has to be descended in the order. You can move the line by selecting it and clicking on the buttons with the up or down arrows until it is at its correct position. In general the right position for “204-Lower purple” is just after the colour “Black” which is used for paths and tracks. It is possible that the colour “Lower purple” already exists at this place in the colour table. It is the colour you might have used in the map file. If this is the case, just place the colour “204-Lower purple” above the “Lower purple” of the map file.
As you have adapted the colours of your map your colour table will not be identical to the one of the screenshot below. But it is important that the colours marked with arrows are at the right spots.
Check
Your OCAD course setting project should now contain the complete MTBO map. The colour layers should be correct so that the course setting elements are displayed correctly. You can test this by placing a control with focus point (symbol 840) on a path track or road. The focus point should be displayed above the path, track or road. The circle should be below it. The samples below show the difference between correct and wrong colour hierarchies.

Manual writted by Christian Gigon
How to import a picture, e.g. a club sign/mark into CS?
I’ve made a orienteering cours and would like to have the clud sign/mark imported into the final map/track. How to do this?
Thank for your support request.
Use the Background Map -> Open function to load a raster logo in OCAD 11 Course Setting edition.
In the OCAD 11 Orienteering Standard edition you can load this logo as Layout object.
Gian-Reto Schaad, OCAD Team