Define Spot Colors
Choose this command from the Map menu to create, edit and delete spot colors. Read the Wikipedia Article to get an impression what spot colors are.
High quality maps are often printed with spot colors. Spot colors are also referred as PMS (Pantone matching system) colors.
Choose the Spot Colors command in the View menu to get a preview of the spot color print.
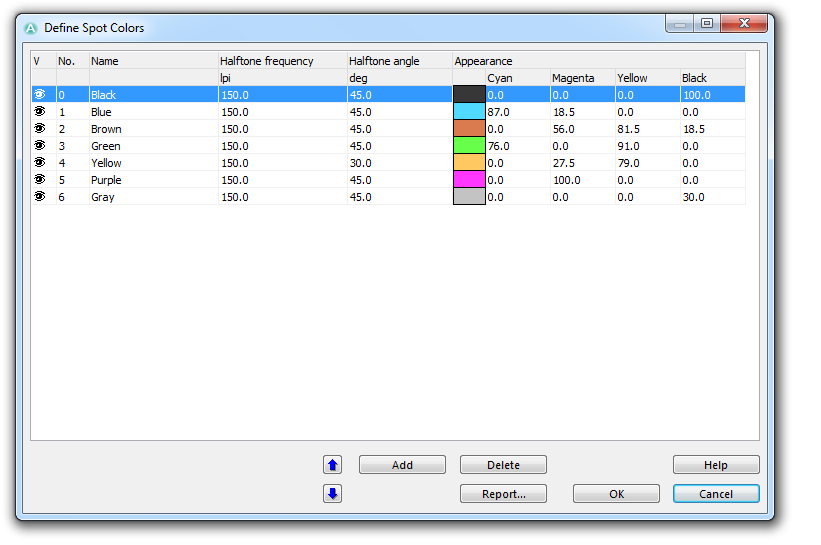
If you choose the Define Spot Colors command in the Map menu, you will get to the Define Spot Colors dialog:
A table shows all currently defined spot colors. The columns provide the following information:
- V (Visible): If you click the eye icon in this column you can hide or display a spot color.
- No. (Number): Enter here a number for the spot color.
- Name: Enter here a name for the spot color.
- Halftone Frequency: This column determines how fine the typesetter will present halftone screens. The standard value is 150 lines per inch (lpi). Read more about this topic in the Wikipedia Article.
- Halftone Angle: This determines the angle of halftone screens. The standard value is 45°. Read more about this topic in the Wikipedia Article.
 If dotted areas are rendered as a halftone screen, then the halftone screen angle should be different from the angle of the dots to avoid Moiré effects on the printed map.
- Appearance: These values are used for the spot color view (the spot color view is a simulation of the map printed with spot colors). They are also used when exporting the map in the AI and PDF format with spot colors.
In addition, you have the following functions:
- Move up: Click the Move up button to move up the selected spot color.
- Move down: Click the Move down button to move down the selected spot color.
- Add: Click this button to create a new spot color.
- Delete: Click this button to delete the currently selected spot color.
Click the Report button to save the table as a XLS, TXT, HTM or DOC-File.
Click the OK button to save all changes and quit the dialog.
