Create Relay Courses: Difference between revisions
No edit summary |
|||
| Line 94: | Line 94: | ||
# The '''Export Relay''' dialog appears which is the same as the '''Print''' dialog. | # The '''Export Relay''' dialog appears which is the same as the '''Print''' dialog. | ||
[[File: | [[File:ExportRelayDialog.PNG]] | ||
You can export: | You can export: | ||
Revision as of 11:52, 10 July 2013
This function is only available in course setting projects!
To set courses for a relay, do the following steps:
- Create a New Course Setting Project.
- Add Course Setting Objects (e.g. Start, Controls, Finish) to the project.
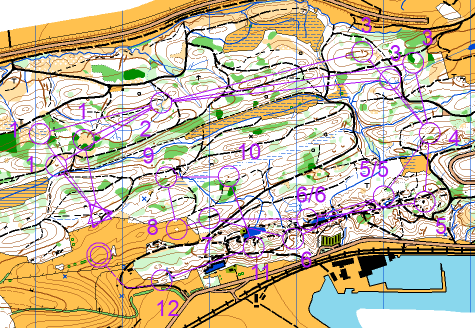
- Create a New Course. Choose Relay as the Course type and define the number of legs.
- Create a New Class. Define the number of teams and allocate start numbers to the class.
- Add the Course Objects to a Course. You have special options for the relay.
Insert a Team Variation
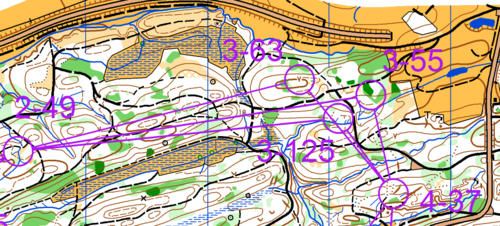
A team variation means that runners of different teams go to different controls. OCAD allocates the chosen amount of controls regularly to the teams, but, to make the relay fair, each runner of the team get a different variation (e.g. Runner 1 goes to control 63, Runner 2 goes to control 55 and Runner 3 goes to control 125). The number of possible variations is given by the number of legs of the relay. If a relay consists of three legs, you will have to make three variations, so that the relay is fair. Although, variations can be equal to eachother (if for example you want to place only two controls instead of three), in this case the equal variations are visited more often than the other one. In any case, OCAD will force you to keep the relay fair (i.e. all teams have run the same leg variations at the end of the relay). Although, you should verify the courses before printing.
- Mark a position in the relay course where you want to insert the variation.
- Click the Insert button in the Course Object Box on the ride side of the window.
- The Insert Course Object dialog appears.
- Choose the Team Variation option.
- Click the OK button.
- The team variation
appears in the course box.
- You can add controls to the variation by marking the correct position and double clicking them.
- The variation for the example above looks as follows:
![]() - It is also possible to leave a variation empty. This means that two runners in a team of three will have to get a control and one runner leaves it out.
- It is also possible to leave a variation empty. This means that two runners in a team of three will have to get a control and one runner leaves it out.
- - OCAD will tell you with a warning message when you are trying to create something unfair.
- - To delete a variation select it and press the Delete key or click the Delete icon.
Insert a Leg Variation
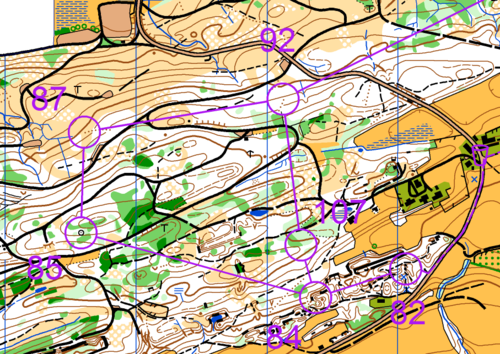
A leg variation means that there is a variation of the legs within the same team. This can be used for when you have a relay with three legs but the second leg is shorter than the other two legs. In the example above the first and the third runner goes from control 92 to 87, then to 85 and finally to control number 84, whereas the second runner goes from control number 92 to 107 and then directly to 84, which is the shorter leg. All runners who run the second leg of the relay will have this shorter variation. It is also possible to make team or additional leg variations within a leg variation itself. The same which applies to the team variation, applies also to the leg variation: OCAD will force you to keep the relay fair (i.e. all teams have run the same leg variations at the end of the relay). Although, you should verify the courses before printing.
- Mark a position in the relay course where you want to insert the variation.
- Click the Insert button in the Course Object Box on the ride side of the window.
- The Insert Course Object dialog appears.
- Choose the Leg Variation option.
- Drag identical legs to the same column in the table.
- Click the OK button when finished.
- The leg variation
appears in the course box. The pink numbers indicate the leg number.
- You can add controls to the variation by marking the correct position and double clicking them.
- The variation for the example above looks as follows:
![]() - It is also possible to leave a variation empty. This means that some legs have additional controls where other legs go directly to the next control in common.
- It is also possible to leave a variation empty. This means that some legs have additional controls where other legs go directly to the next control in common.
- - OCAD will tell you with a warning message when you are trying to create something unfair.
- - To delete a variation select it and press the Delete key or click the Delete icon.
Add the Variant to the Map
Read the Add Variant for Relay Courses article for more information.
Add the Start Number to the Map
Read the Add Start Numbers for Relay Courses article for more information.
Print a Relay Course
- Choose Courses in the Print submenu of the Course Setting menu.
- Adjust the print settings with help of the Print Courses and the Printing Maps pages of this Wiki.
- Select the relay course in the Select Courses/Classes field.
- Click the Print button.
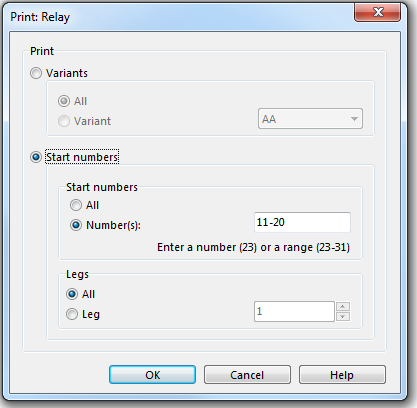
- The Print dialog appears.
You can print:
- Variants
- All: All variants are printed once.
- Variant: The variant selected in the dropdown list is printed once.
- Start numbers
- All: All courses to all defined start numbers (in the Classes dialog) are printed. The variations are allocated regularly to the teams.
- Number(s): All courses to the defined start numbers (in the Classes dialog) entered in this field are printed. The variations are allocated regularly to the teams. You can enter a single start number (e.g. 23) or a range of numbers (e.g. 23-31).
- Legs: If you choose the Start numbers option you also have to define which legs you want to print.
- All: All legs of the selected start numbers are printed.
- Leg: Enter a leg number if you want to print only single legs of the selected start numbers.
Click the OK button when finished. The courses are printed. This can take a moment.
![]() You can anytime reprint the course for a specific runner under the condition that nothing in the variations has been changed.
You can anytime reprint the course for a specific runner under the condition that nothing in the variations has been changed.
Export
Export a Relay Course
- Choose Export in the File menu.
- Adjust the export settings with help of the Export Files page of this Wiki.
- Click the Export button.
- The Select Courses/Classes dialog appears.
- Select the relay course and click the OK button.
- The Export Relay dialog appears which is the same as the Print dialog.
You can export:
- Variants
- All: All variants are exported once.
- Variant: The variant selected in the dropdown list is exported once.
- Start numbers
- All: All courses to all defined start numbers (in the Classes dialog) are exported. The variations are allocated regularly to the teams.
- Number(s): All courses to the defined start numbers (in the Classes dialog) entered in this field are exported. The variations are allocated regularly to the teams. You can enter a single start number (e.g. 23) or a range of numbers (e.g. 23-31).
- Legs: If you choose the Start numbers option you also have to define which legs you want to export.
- All: All legs of the selected start numbers are exported.
- Leg: Enter a leg number if you want to export only single legs of the selected start numbers.
Click the OK button when finished. The courses are exported. This can take a moment.
Export Relay Variations
- Choose the Export Relay Variations command in the Export submenu of the Course Setting menu.
- The Export Relay Variations dialog appears.
- Browse a location and enter a name for the file to export.
- Click the Save button to export the txt-file.
The Text-File contains all courses. The start numbers are listed with the corresponding variation.
Back to the Course Setting for Orienteering page.


