Working on a CSA Project: Unterschied zwischen den Versionen
FBO (Diskussion | Beiträge) Keine Bearbeitungszusammenfassung |
JBO (Diskussion | Beiträge) Keine Bearbeitungszusammenfassung |
||
| (27 dazwischenliegende Versionen von 2 Benutzern werden nicht angezeigt) | |||
| Zeile 1: | Zeile 1: | ||
[[Category:Client Server Architecture]] | [[Category:Client Server Architecture]][[File:Ent40px.PNG|This function is only available in the OCAD 11 Enterprise Edition.|link=https://www.ocad.com/en/products/ocad-for-cartography]] | ||
''Diese Funktion ist in OCAD 11 nur in Englisch verfügbar.'' | |||
After the '''[[Create a New CSA Project|Creation of a New CSA Project]]''', you can start working on it. | |||
==Editing== | ==Editing== | ||
New objects can be drawn as you know it from normal OCAD projects, but, when you are finished, you will have to check it in. For drawing new objects follow the list below from point 3 on. If you want to edit an existing object, you will first have to check it out. Make sure that you have the '''[[Rights Management|Right]]''' to edit objects. | |||
===Check Out Selected Objects=== | |||
# Select an object you want to edit. '''[[Select#Select_and_Edit_Multiple_Objects|Select Multiple Objects]]''' to edit more than one object. | |||
# Click the [[File:Icon_CheckOut.PNG]] '''Check out Selected Objects''' icon in the '''Client Server''' toolbar. The selected objects are now checked out, which means that nobody else is allowed to make modifications on them at the moment. | |||
# Edit the checked out objects or, if you are creating new objects, draw them. | |||
===Check In Selected Objects=== | |||
When finished, you have to check in the objects again. There are two possible ways to do so: | |||
# Select all edited or drawn objects and click the [[File:Icon_CheckIn.PNG]] '''Check in Selected Objects''' icon from the '''Client Server''' toolbar. | |||
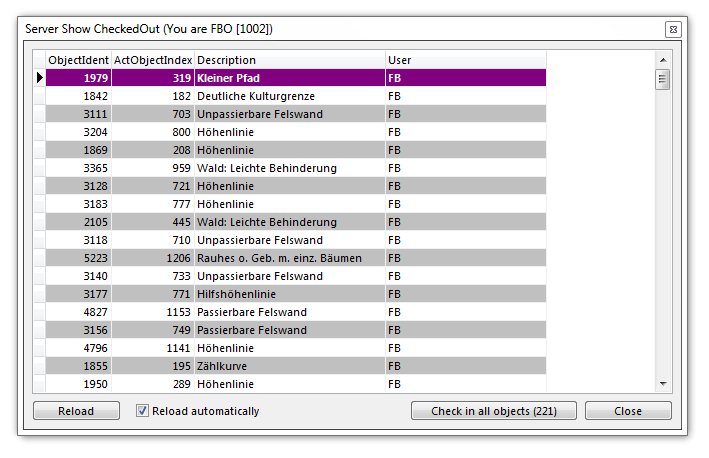
# Click the [[File:Icon_ShowCheckedOutObjects.PNG]] '''Show Checked out Objects''' icon from the '''Client Server''' toolbar. The '''Show Checked out Objects''' dialog appears with a table of all checked out objects. | |||
#: [[File:CheckedOutObjects.PNG]] | |||
: This is a non-modal dialog which means that it can be stayed open when editing the map. If the '''Reload automatically''' option is checked the table is updated automatically when checking out an object. Otherwise, you will have to click the '''Reload''' button. Click an object in the table to show it on the map. Click the '''Check in all objects''' button to check in all objects. | |||
===Delete Objects in Database=== | |||
Click the [[File:Icon_DeleteObjectsInDatabase.PNG]] '''Delete Objects in Database''' button or press the '''Alt''' and the '''Delete''' key together to delete an object from the server. Note that you first have to check out the object which you want to delete. If you delete an object with just the '''Delete''' key, the object will be deleted only in the current view but will remain on the server. By clicking the [[File:Icon_GetObjectsFromCurrentView.PNG]] '''Get Objects from Current View''' button it will show up again. | |||
An object which is not checked out cannot be edited and is indicated with red '''[[Vertices]]'''. | |||
==Undo and Redo== | ==Undo and Redo== | ||
In contrast to the default '''[[Undo and Redo]]''' functions, in the '''[[Client Server Architecture]]''' every object has to be undone separately. For example a move of two objects needs two undo steps. | |||
By pressing the '''Alt''' key and clicking the [[File:Icon_CSA_Undo.PNG]] Undo or the [[File:Icon_CSA_Redo.PNG]] Redo icon in the '''Client Server''' toolbar the '''Server Objects Change History''' dialog appears with two lists: The '''Object Changes''' and '''Object Inserts''' list. They are located in two different tabs. | |||
ToDo | |||
==Generate Map Preview== | ==Generate Map Preview== | ||
If you open a project without a map preview, it is just blank. It is quite difficult to find the location on the map you want to work on. With a map preview it is easier and you will not have to load all the objects but only those you really need. | |||
# Click the [[File:Icon_GetObjectsFromCurrentView.PNG]] '''Get Objects from Current View''' icon in the '''Client Server''' toolbar with the '''Alt''' key pressed. | |||
# The '''View Objects in Database''' dialog appears. Click the '''Get all''' button to load all objects. This can take a moment. | |||
# When all objects are loaded, click the [[File:Icon_GenerateMapPreview.PNG]] '''Generate Map Preview''' icon in the '''Client Server''' toolbar. | |||
# The '''Generate Preview''' dialog appears. You can define a pixel size in m. The smaller the pixel size is the better is the quality of the map preview. Click the '''OK''' button to generate the map. | |||
The map preview is a normal raster background map and can be managed by using the '''Manage''' command from the '''[[Background Map]]''' menu. | |||
==Offline Work== | ==Offline Work== | ||
It is possible to save parts of the project in a local offline file and sync them after working on it with the CSA-Project again. | |||
# Get all objects (with the [[File:Icon_GetObjectsFromCurrentView.PNG]] '''[[Create a New CSA Project#Get Objects|Get Objects from Current View]]''' function from the '''Client Server''' toolbar) you want to work on offline. | |||
# Check them out (Select them and click the [[File:Icon_CheckOut.PNG]] '''[[Working on a CSA Project#Check Out Selected Objects|Check Out Selected Objects]]''' icon from the '''Client Server''' toolbar.) | |||
# Click the [[File:Icon_SaveForOfflineWork.PNG]] '''Save for Offline Work''' icon in the '''Client Server''' toolbar. | |||
# The '''Save As''' dialog appears. Browse a location and enter a name for the offline copy, then click the '''Save''' button. | |||
# The CSA-Project closes automatically. | |||
# Open the offline copy with the '''[[File#Open|Open]]''' command in the '''[[File]]''' menu. | |||
# You can now work on this file. | |||
# When finished click the [[File:Icon_ConnectDisconnect.PNG]] '''Connect/Disconnect''' icon in the '''Client Server''' toolbar. The offline copy must be opened. | |||
# Select the CSA-Project in the table of the '''New Connection''' dialog, check the '''Import mode''' option and click the '''Load selected project''' button. | |||
# OCAD will ask you if you want to sync the offline file with the CSA-Project. Click the '''Yes''' button. Note that this synchronization cannot be made undone. | |||
# OCAD syncs changes as well as new objects and will tell you, when it is finished. Then it will close the offline copy. | |||
# Load the CSA-Project again. | |||
# The synced objects of the offline copy are not checked in yet. Check them in again ([[File:Icon_CheckIn.PNG]] '''[[Working on a CSA Project#Check In Selected Objects|Check In Selected Objects]]'''). | |||
==Maintenance== | ==Maintenance== | ||
The [[File:Icon_DoDatabaseMaintenance.PNG]] '''Do Database Maintenance''' function in the '''Client Server''' toolbar cleans up the database. It also deletes the undo and redo log, so handle with care! | |||
==Bookmarks== | ==Bookmarks== | ||
Bookmarks are stored views of the map, which can be easily retrieved. In addition, you can add a name and a description to the bookmark. They can be stored as private or as public. Public bookmarks are shown to every user of the CSA-Project. As an example, you can send a note to the map makers which areas have to be edited. Private bookmarks are just shown to one user. | |||
Click the [[File:Icon_ManageServerBookmarks.PNG]] '''Manage Server Bookmarks''' icon in the '''Client Server''' toolbar. The '''Manage Bookmarks''' dialog appears. | |||
[[File:ManageBookmarks.PNG]] | |||
Click on My Bookmarks to open the subgroups. To add a bookmark, select either the '''Private''' or '''Public''' group and click them with the right mouse button. A submenu appears. Click the '''Add Bookmark''' command. The dialog enlarges. Select a group, either '''Private''' or '''Public''', in the dropdown list and enter a name for the bookmark. In addition, you can add a description. | |||
To delete a bookmark, select it in the bookmark tree, click it with the right mouse button and choose the '''Delete Bookmark''' command. | |||
To change a bookmark, click it with the right mouse button and choose the '''Update Bookmark''' command. Now you can make modifications and decide if only the description is to be updated or also the position (current view). | |||
[[File:UpdateBookmark.PNG]] | |||
To retrieve a bookmark, select it in the bookmark tree and click the '''Go to bookmark''' button. The view changes to the saved one. | |||
This is a non-modal dialog. You can work on the map while keeping the dialog open. | |||
==Project Information== | ==Project Information== | ||
Click the [[File:Icon_ShowProjectInformation.PNG]] '''Show Project Information''' icon in the '''Client Server''' toolbar to get the following information: | |||
* Users of the project | |||
* Users who are currently working on the project | |||
* Objects in the database | |||
* Your rights on the project | |||
* Users who are working offline | |||
* '''[[Working on a CSA Project#Check Out Selected Objects|Checked out objects]]''' | |||
==Object History== | |||
Select an object and click the [[File:Icon_ObjectHistory.PNG]] '''Object History''' icon in the '''Client Server''' toolbar to show its history. | |||
The '''Server Object Info''' dialog appears with the following information: | |||
* Object ID | |||
* Object creator | |||
* Object creation date | |||
* Last update of the object | |||
* User which made the last update | |||
* A list of all changes made on the object | |||
[[File:ObjectHistory.PNG]] | |||
---- | |||
Last page: '''[[Create a New CSA Project]]'''<br /> | |||
Next page: '''[[Raster Background Maps in CSA]]'''<br /> | |||
Back to the '''[[Client Server Architecture]]''' page.<br /> | |||
An overview about all pages dealing with the '''[[Client Server Architecture]]''' can be found in the corresponding category (see below for the link). | |||
Aktuelle Version vom 17. Juli 2013, 09:56 Uhr
Diese Funktion ist in OCAD 11 nur in Englisch verfügbar.
After the Creation of a New CSA Project, you can start working on it.
Editing
New objects can be drawn as you know it from normal OCAD projects, but, when you are finished, you will have to check it in. For drawing new objects follow the list below from point 3 on. If you want to edit an existing object, you will first have to check it out. Make sure that you have the Right to edit objects.
Check Out Selected Objects
- Select an object you want to edit. Select Multiple Objects to edit more than one object.
- Click the
Check out Selected Objects icon in the Client Server toolbar. The selected objects are now checked out, which means that nobody else is allowed to make modifications on them at the moment.
- Edit the checked out objects or, if you are creating new objects, draw them.
Check In Selected Objects
When finished, you have to check in the objects again. There are two possible ways to do so:
- Select all edited or drawn objects and click the
Check in Selected Objects icon from the Client Server toolbar.
- Click the
Show Checked out Objects icon from the Client Server toolbar. The Show Checked out Objects dialog appears with a table of all checked out objects.
- This is a non-modal dialog which means that it can be stayed open when editing the map. If the Reload automatically option is checked the table is updated automatically when checking out an object. Otherwise, you will have to click the Reload button. Click an object in the table to show it on the map. Click the Check in all objects button to check in all objects.
Delete Objects in Database
Click the Delete Objects in Database button or press the Alt and the Delete key together to delete an object from the server. Note that you first have to check out the object which you want to delete. If you delete an object with just the Delete key, the object will be deleted only in the current view but will remain on the server. By clicking the
Get Objects from Current View button it will show up again.
An object which is not checked out cannot be edited and is indicated with red Vertices.
Undo and Redo
In contrast to the default Undo and Redo functions, in the Client Server Architecture every object has to be undone separately. For example a move of two objects needs two undo steps.
By pressing the Alt key and clicking the Undo or the
Redo icon in the Client Server toolbar the Server Objects Change History dialog appears with two lists: The Object Changes and Object Inserts list. They are located in two different tabs.
ToDo
Generate Map Preview
If you open a project without a map preview, it is just blank. It is quite difficult to find the location on the map you want to work on. With a map preview it is easier and you will not have to load all the objects but only those you really need.
- Click the
Get Objects from Current View icon in the Client Server toolbar with the Alt key pressed.
- The View Objects in Database dialog appears. Click the Get all button to load all objects. This can take a moment.
- When all objects are loaded, click the
Generate Map Preview icon in the Client Server toolbar.
- The Generate Preview dialog appears. You can define a pixel size in m. The smaller the pixel size is the better is the quality of the map preview. Click the OK button to generate the map.
The map preview is a normal raster background map and can be managed by using the Manage command from the Background Map menu.
Offline Work
It is possible to save parts of the project in a local offline file and sync them after working on it with the CSA-Project again.
- Get all objects (with the
Get Objects from Current View function from the Client Server toolbar) you want to work on offline.
- Check them out (Select them and click the
Check Out Selected Objects icon from the Client Server toolbar.)
- Click the
Save for Offline Work icon in the Client Server toolbar.
- The Save As dialog appears. Browse a location and enter a name for the offline copy, then click the Save button.
- The CSA-Project closes automatically.
- Open the offline copy with the Open command in the File menu.
- You can now work on this file.
- When finished click the
Connect/Disconnect icon in the Client Server toolbar. The offline copy must be opened.
- Select the CSA-Project in the table of the New Connection dialog, check the Import mode option and click the Load selected project button.
- OCAD will ask you if you want to sync the offline file with the CSA-Project. Click the Yes button. Note that this synchronization cannot be made undone.
- OCAD syncs changes as well as new objects and will tell you, when it is finished. Then it will close the offline copy.
- Load the CSA-Project again.
- The synced objects of the offline copy are not checked in yet. Check them in again (
Check In Selected Objects).
Maintenance
The Do Database Maintenance function in the Client Server toolbar cleans up the database. It also deletes the undo and redo log, so handle with care!
Bookmarks
Bookmarks are stored views of the map, which can be easily retrieved. In addition, you can add a name and a description to the bookmark. They can be stored as private or as public. Public bookmarks are shown to every user of the CSA-Project. As an example, you can send a note to the map makers which areas have to be edited. Private bookmarks are just shown to one user.
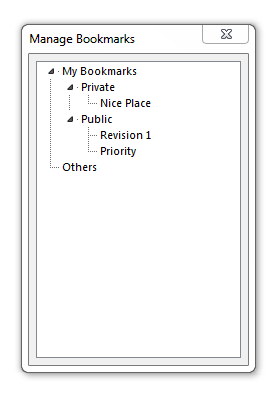
Click the Manage Server Bookmarks icon in the Client Server toolbar. The Manage Bookmarks dialog appears.
Click on My Bookmarks to open the subgroups. To add a bookmark, select either the Private or Public group and click them with the right mouse button. A submenu appears. Click the Add Bookmark command. The dialog enlarges. Select a group, either Private or Public, in the dropdown list and enter a name for the bookmark. In addition, you can add a description.
To delete a bookmark, select it in the bookmark tree, click it with the right mouse button and choose the Delete Bookmark command.
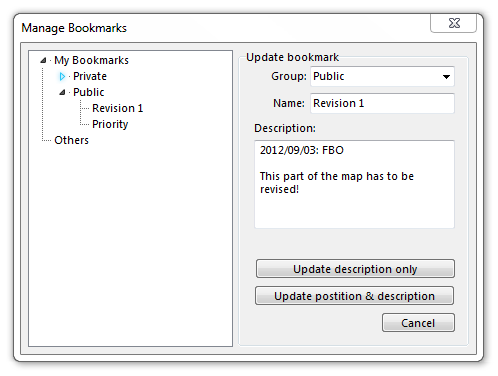
To change a bookmark, click it with the right mouse button and choose the Update Bookmark command. Now you can make modifications and decide if only the description is to be updated or also the position (current view).
To retrieve a bookmark, select it in the bookmark tree and click the Go to bookmark button. The view changes to the saved one.
This is a non-modal dialog. You can work on the map while keeping the dialog open.
Project Information
Click the Show Project Information icon in the Client Server toolbar to get the following information:
- Users of the project
- Users who are currently working on the project
- Objects in the database
- Your rights on the project
- Users who are working offline
- Checked out objects
Object History
Select an object and click the Object History icon in the Client Server toolbar to show its history.
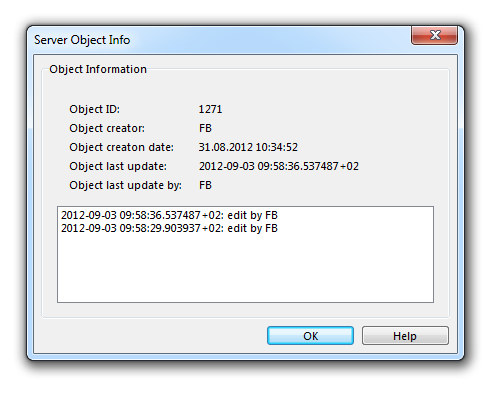
The Server Object Info dialog appears with the following information:
- Object ID
- Object creator
- Object creation date
- Last update of the object
- User which made the last update
- A list of all changes made on the object
Last page: Create a New CSA Project
Next page: Raster Background Maps in CSA
Back to the Client Server Architecture page.
An overview about all pages dealing with the Client Server Architecture can be found in the corresponding category (see below for the link).


