Karten drucken: Unterschied zwischen den Versionen
Zur Navigation springen
Zur Suche springen
FBO (Diskussion | Beiträge) Keine Bearbeitungszusammenfassung |
FBO (Diskussion | Beiträge) Keine Bearbeitungszusammenfassung |
||
| Zeile 5: | Zeile 5: | ||
# In the '''Page handling''' box you can set the page orientation ('''Portrait''' or '''Landscape''') and the number of copies you would like to print. | # In the '''Page handling''' box you can set the page orientation ('''Portrait''' or '''Landscape''') and the number of copies you would like to print. | ||
# Decide between '''Color printing''' or '''Spot color separations (Black & White printing)''' in the next box. Select the second option to print black and withe spot color separations. Choose '''[[Define Spot Colors]]''' from the '''Map''' menu to define spot colors. When this radio button is activated and spot colors are defined, you can select one or more of the defined spot colors in the '''Spot colors''' list box. | # Decide between '''Color printing''' or '''Spot color separations (Black & White printing)''' in the next box. Select the second option to print black and withe spot color separations. Choose '''[[Define Spot Colors]]''' from the '''Map''' menu to define spot colors. When this radio button is activated and spot colors are defined, you can select one or more of the defined spot colors in the '''Spot colors''' list box. | ||
# Define the print scale in the '''Scale''' box. | # Define the print scale in the '''Scale''' box. You can enter the scale on the keyboard, or choose one of the predefined scales. If the print scale is different from the map scale, the map and the symbols are enlarged/reduced according to the ratio of the map and print scales. | ||
# In the '''Print map size''' box you have the following options: | # In the '''Print map size''' box you have the following options: | ||
#*'''Entire map''': The entire map will be printed. Gray frames show a print preview on the basis of the defined paper size in the printer settings. If the map is too large for one page, it will be printed on several pages. Click on the '''Setup''' icon [[File:Properties.PNG]] to make more adjustments. | #*'''Entire map''': The entire map will be printed. Gray frames show a print preview on the basis of the defined paper size in the printer settings. If the map is too large for one page, it will be printed on several pages. Click on the '''Setup''' icon [[File:Properties.PNG]] to make more adjustments. | ||
#*'''Part of map''': Print a part of the map. If you choose this option a thin black | #*'''Part of map''': Print a part of the map. If you choose this option a thin black and a grey frame appear. If you cannot see the frames, click '''Zoom out''' in the '''View''' menu until the frames become visible. The thin black frame shows the area which is to be printed, the grey frame shows the paper size. Adjust the thin black frame to your desired map part. | ||
#*'''One page''': Select this option to print one page of paper of the map. Click the '''Setup''' [[File:Properties.PNG]] button to define the region to be printed. | |||
#*'''One page''': | |||
#*If you cannot see the frame, click '''Zoom out''' in the '''View''' menu until the frame becomes visible. | #*If you cannot see the frame, click '''Zoom out''' in the '''View''' menu until the frame becomes visible. | ||
# In the '''Options''' box you can make the following adjustments: | # In the '''Options''' box you can make the following adjustments: | ||
| Zeile 19: | Zeile 18: | ||
#* '''Print screen grid:''' Check this box to print a grid on the map. Choose the color of the grid in the drop-down list. | #* '''Print screen grid:''' Check this box to print a grid on the map. Choose the color of the grid in the drop-down list. | ||
#:[[File:PrintGrid.PNG|600px]] | #:[[File:PrintGrid.PNG|600px]] | ||
# Click ''' | # Click '''Print''' to print out the respective area. | ||
: Click '''Save XML''' to save an XML file with the print settings (Same filename and path as OCAD map). Use '''[[XML Script|Execute XML Script]]''' command in '''File''' menu to print the map with the settings saved in the XML file. | |||
Hide the background map before printing the map, if you do not want this to be printed out as well. | |||
If you are still in '''Draft mode''', select '''Normal Mode''' in the '''View''' menu. | If you are still in '''Draft mode''', select '''Normal Mode''' in the '''View''' menu. | ||
'''Options''' | |||
: -'''Left:''' Enter here the left border of the page. | : -'''Left:''' Enter here the left border of the page. | ||
: -'''Bottom: '''Enter here the bottom border of the page. | : -'''Bottom: '''Enter here the bottom border of the page. | ||
Previous Chapter: [[Export Files]] | Previous Chapter: [[Export Files]] | ||
Version vom 26. April 2012, 13:40 Uhr
To print the map:
- Select Print in the File menu, press Ctrl+P or click on the Print icon
in the standard toolbar. The Print dialog appears on the right hand side of the window.
- Select the printer to print the map. In the box you can select one of the installed Windows printer drivers. Click the Properties button
to change printing options.
- In the Page handling box you can set the page orientation (Portrait or Landscape) and the number of copies you would like to print.
- Decide between Color printing or Spot color separations (Black & White printing) in the next box. Select the second option to print black and withe spot color separations. Choose Define Spot Colors from the Map menu to define spot colors. When this radio button is activated and spot colors are defined, you can select one or more of the defined spot colors in the Spot colors list box.
- Define the print scale in the Scale box. You can enter the scale on the keyboard, or choose one of the predefined scales. If the print scale is different from the map scale, the map and the symbols are enlarged/reduced according to the ratio of the map and print scales.
- In the Print map size box you have the following options:
- Entire map: The entire map will be printed. Gray frames show a print preview on the basis of the defined paper size in the printer settings. If the map is too large for one page, it will be printed on several pages. Click on the Setup icon
to make more adjustments.
- Part of map: Print a part of the map. If you choose this option a thin black and a grey frame appear. If you cannot see the frames, click Zoom out in the View menu until the frames become visible. The thin black frame shows the area which is to be printed, the grey frame shows the paper size. Adjust the thin black frame to your desired map part.
- One page: Select this option to print one page of paper of the map. Click the Setup
button to define the region to be printed.
- If you cannot see the frame, click Zoom out in the View menu until the frame becomes visible.
- Entire map: The entire map will be printed. Gray frames show a print preview on the basis of the defined paper size in the printer settings. If the map is too large for one page, it will be printed on several pages. Click on the Setup icon
- In the Options box you can make the following adjustments:
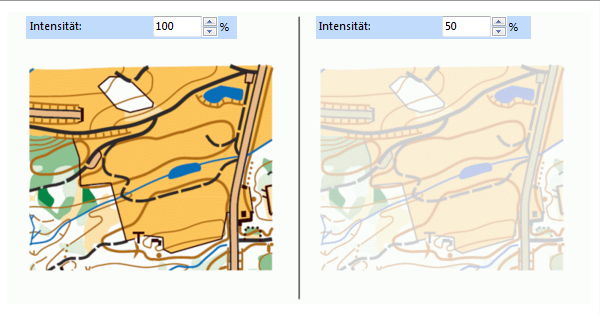
- Intensity: For older ink jet printers you can reduce the color intensity here. This reduces the amount of ink applied.
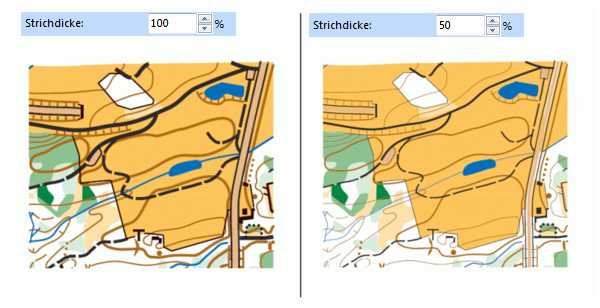
- Line width: For older ink jet printers you can reduce the line width here. This reduces the amount of ink applied.
- Print screen grid: Check this box to print a grid on the map. Choose the color of the grid in the drop-down list.
- Click Print to print out the respective area.
- Click Save XML to save an XML file with the print settings (Same filename and path as OCAD map). Use Execute XML Script command in File menu to print the map with the settings saved in the XML file.
Hide the background map before printing the map, if you do not want this to be printed out as well. If you are still in Draft mode, select Normal Mode in the View menu.
Options
- -Left: Enter here the left border of the page.
- -Bottom: Enter here the bottom border of the page.
Previous Chapter: Export Files
Next Chapter: DEM
Back to Main Page


