DHM Profil: Unterschied zwischen den Versionen
JBO (Diskussion | Beiträge) K (JBO verschob Seite DEM Profile nach DHM Profil) |
JBO (Diskussion | Beiträge) Keine Bearbeitungszusammenfassung |
||
| (5 dazwischenliegende Versionen desselben Benutzers werden nicht angezeigt) | |||
| Zeile 1: | Zeile 1: | ||
Um diese Funktion nutzen zu können, muss ein '''[[DHM]]''' geladen sein. | |||
== | ==Profil erstellen [[File:Space.PNG]][[File:Pro40px.PNG|This function is available in OCAD 11 Professional.|link=https://www.ocad.com/en/products/ocad-for-cartography]][[File:Std40px.PNG|This function is available in OCAD 11 Orienteering Standard.|link=https://www.ocad.com/en/products/ocad-for-orienteering]][[File:Sta40px.PNG|This function is available in OCAD 11 Starter.|link=https://www.ocad.com/en/products/ocad-for-orienteering]][[File:CS40px.PNG|This function is available in OCAD 11 Course Setting.|link=https://www.ocad.com/en/products/ocad-for-orienteering]]== | ||
Um ein Profil zu erstellen: | |||
# | # Selektieren Sie ein Linienobjekt innerhalb der '''[[DHM]]''' Daten. Fügen Sie der Linie einen '''[[Vertices#Eckpunkt hinzufügen|Eckpunkt]]''' hinzu, um eine Unterbrechung zu erzeugen. Unterbrechungen sind nach dem Exportieren der OCAD-Datei oder nach dem Hinzufügen zu einer Karte sichtbar. | ||
#: [[File:ProfileRoute.PNG]] | #: [[File:ProfileRoute.PNG]] | ||
# | # Wählen Sie den Befehl '''Profil erzeugen''' im '''DHM'''-Menü. | ||
# | # Der '''DHM Profil'''-Dialog erscheint und das Profil wird angezeigt. | ||
#: [[File:DEMProfile.PNG|700px]] | #: [[File:DEMProfile.PNG|700px]] | ||
Sie haben nun mehrere Optionen: | |||
*''' | *'''Automatisches Skalieren''': Ist diese Option aktiviert, wählt OCAD einen Massstab, welcher am besten zur Dialogbox passt. | ||
*''' | *'''Massstab''': Wählen Sie den gewünschten Massstab im Dropdown-Menü. | ||
*''' | *'''Gitter anzeigen''': Wenn diese Option aktiviert ist, wird ein Gitter im Profil angezeigt. | ||
*''' | *'''Überhöhungsfaktor''': Wählen Sie einen Überhöhungsfaktor im Dropdown-Menü. Dies ist der Massstab-Faktor für die horizontale Profilachse (Höhe). | ||
* | *Die '''Auflösungshöhe''' und die '''Auflösungslänge''' sind Filter, welche die Berechnung von totaler Steigung und totalem Gefälle beeinflussen. Diese Auflösungswerte sollten nicht genauer als die Auflösungshöhe und die Zellengrösse des DHMs sein. | ||
[[File:Hint.jpg|hint]] ''' | [[File:Hint.jpg|hint]] Der '''DHM Profil'''-Dialog ist ein nichtmodaler Dialog. Der Benutzer kann zum OCAD-Kartenfenster wechseln. Es ist möglich, die selektierte Linie in der OCAD-Karte zu editieren. Drücken Sie die '''Aktualisieren'''-Schaltfläche im '''DHM Profil'''-Dialog, um das Profil der bearbeiteten Linie oder das Profil einer neu selektierten Linie zu sehen. | ||
== | ==Profil exportieren [[File:Space.PNG]][[File:Pro40px.PNG|This function is available in OCAD 11 Professional.|link=https://www.ocad.com/en/products/ocad-for-cartography]]== | ||
=== | ===OCD exportieren=== | ||
Drücken Sie die Schaltfläche '''OCD exportieren''', um das Profil in eine neue OCD-Datei zu exportieren. Der '''DHM Profil Optionen'''-Dialog erscheint. | |||
[[File:DEMProfileOptions.PNG]] | [[File:DEMProfileOptions.PNG]] | ||
Die Datei ''Template DEM Profile.ocd'' im ''OCAD''-Verzeichnis wurde standartmässig als Vorlage-Datei (Für Symbolsatz, Farben etc.) gewählt. | |||
{| class="wikitable" style=" border="1" | {| class="wikitable" style=" border="1" | ||
|- | |- | ||
! style="width:8em" | | ! style="width:8em" | Symbolnumber | ||
! style="width:18em" | | ! style="width:18em" | Beschreibung | ||
! style="width:8em" | | ! style="width:8em" | Symboltyp | ||
! style="width:18em" | | ! style="width:18em" | Farbe(n) | ||
|- | |- | ||
| 10000.001 || DEM: Elevation Text || | | 10000.001 || DEM: Elevation Text || Textsymbol || 10000: UPPER BLACK DEM PROFILE | ||
|- | |- | ||
| 10000.002 || DEM: Distance Text || | | 10000.002 || DEM: Distance Text || Textsymbol || 10000: UPPER BLACK DEM PROFILE | ||
|- | |- | ||
| 10000.003 || DEM: Text || | | 10000.003 || DEM: Text || Textsymbol || 10000: UPPER BLACK DEM PROFILE | ||
|- | |- | ||
| 10000.004 || DEM: Horizontal Grid Line || | | 10000.004 || DEM: Horizontal Grid Line || Liniensymbol || 10006: LOWER BLACK DEM PROFILE | ||
|- | |- | ||
| 10000.005 || DEM: Profile Frame || | | 10000.005 || DEM: Profile Frame || Liniensymbol || 10000: UPPER BLACK DEM PROFILE | ||
|- | |- | ||
| 10000.006 || DEM: Profile Line || | | 10000.006 || DEM: Profile Line || Liniensymbol || 10005: LOWER RED DEM PROFILE | ||
|- | |- | ||
| 10000.007 || DEM: Profile Area || | | 10000.007 || DEM: Profile Area || Flächensymbol || 10003: GREEN DEM PROFILE | ||
|- | |- | ||
| 10000.008 || DEM: White Background || | | 10000.008 || DEM: White Background || Flächensymbol || 10002: WHITE DEM PROFILE | ||
|- | |- | ||
| 10000.009 || DEM: Horizontal Tag || | | 10000.009 || DEM: Horizontal Tag || Punktsymbol || 10000: UPPER BLACK DEM PROFILE | ||
|- | |- | ||
| 10000.010 || DEM: Vertical Tag || | | 10000.010 || DEM: Vertical Tag || Punktsymbol || 10000: UPPER BLACK DEM PROFILE | ||
|- | |- | ||
| 10000.011 || DEM: Time Text || | | 10000.011 || DEM: Time Text || Textsymbol || 10000: UPPER BLACK DEM PROFILE | ||
|- | |- | ||
| 10000.012 || DEM: Label Text Stopover || | | 10000.012 || DEM: Label Text Stopover || Textsymbol || 10000: UPPER BLACK DEM PROFILE | ||
|- | |- | ||
| 10000.014 || DEM: Label Text Start- and Endpoint || | | 10000.014 || DEM: Label Text Start- and Endpoint || Textsymbol || 10000: UPPER BLACK DEM PROFILE | ||
|- | |- | ||
| 10000.020 || DEM: Profile Startpoint || | | 10000.020 || DEM: Profile Startpoint || Punktsymbol || 10001: UPPER RED DEM PROFILE, 10004: YELLOW DEM PROFILE | ||
|- | |- | ||
| 10000.021 || DEM: Profile Stopover || | | 10000.021 || DEM: Profile Stopover || Punktsymbol || 10001: UPPER RED DEM PROFILE <br> 10004: YELLOW DEM PROFILE | ||
|- | |- | ||
| 10000.022 || DEM: Profile Endpoint || | | 10000.022 || DEM: Profile Endpoint || Punktsymbol || 10001: UPPER RED DEM PROFILE <br> 10004: YELLOW DEM PROFILE | ||
|- | |- | ||
| 10000.041 || DEM: Vertical Grid Line || | | 10000.041 || DEM: Vertical Grid Line || Liniensymbol || 10006: LOWER BLACK DEM PROFILE | ||
|- | |- | ||
| 10000.051 || DEM: Profile Restaurant || | | 10000.051 || DEM: Profile Restaurant || Punktsymbol || 10000: UPPER BLACK DEM PROFILE <br> 10001: UPPER RED DEM PROFILE <br> 10007: UPPER WHITE DEM PROFILE | ||
|} | |} | ||
In | In der Kategorie '''Einheiten und Format''' können Sie wählen, ob die Distanz in '''km''' oder '''m''' angezeigt werden soll. Ausserdem können Sie auch das Zeitformat (im Moment nur '''h:mm''' vorhanden) und Rundungseigenschaften ('''keine Rundung''', '''Auf 5 min runden''', '''Auf 10 min runden''' einstellen. Deaktivieren Sie '''Text unterhalb des Profils anzeigen''', wenn Sie keinen Text unter Ihrem Profil wünschen. | ||
In | In der Kategorie '''Beschriftungen und Symbole''', können Beschriftungen und Symbole dem Startpunkt, Endpunkt oder einem Zwischenstopp zugeteilt werden.Geben Sie eine Beschriftung im entsprechenden Feld (z.B. Name eines Standortes) ein und wählen Sie ein Symbol aus der Dropdown-Liste. Diese Symbole sind in einer Vorlagedatei definiert. Fügen Sie der Linie, welche das Profil definiert, einen '''[[Vertices#Eckpunkt hinzufügen|Eckpunkt]]''' hinzu, um einen Zwischenstopp zu erzeugen. | ||
Wählen Sie '''OK''', um den Vorgang abzuschliessen. Im nächsten Dialog müssen Sie das Profil im gewünschten Verzeichnis abspeichern. Um das Dokument zu öffnen, nutzen Sie die Funktion '''[[File#Kürzlich exportierte Dateien öffnen|Kürzlich exportierte Dateien öffnen]]''' aus dem '''[[Datei]]'''-Menü. Das Profil kann dort bearbeitet werden (z.B. können Farben geändert oder Objekte hinzugefügt werden). | |||
[[File:ProfileExample.PNG|800px]] | [[File:ProfileExample.PNG|800px]] | ||
Zwischenstopps werden im Profil als Punkt auf der Profillinie mit einer vertikalen Linie zur x-Achse abgebildet. Sowie bei Start- und Endpunkt als auch bei den Zwischenstopps werden die zurückgelegte Distanz und Laufzeit angezeigt. | |||
=== | ===BMP oder GIF exportieren=== | ||
Wählen Sie '''BMP/GIF exportieren''', um das Profil als Rastebild zu exportieren. Der Dialog '''Bild speichern''' erscheint. Suchen Sie das gewünschte Verzeichnis und geben Sie einen Dateinamen ein. Wählen Sie den Dateitypen. Wählen Sie '''Speichern''', um den Vorgang abzuschliessen. Das exportierte Profil sieht gleich aus wie das Profil im '''DHM Profil'''-Dialog. | |||
=== | ===Zur Karte hinzufügen=== | ||
Beachten Sie: Diese Funktion ist ähnlich wie '''[[DEM Profile#OCD exportieren|OCD exportieren]]'''. Für mehr Informationen und Hilfe besuchen Sie den entsprechenden Artikel. | |||
Wählen Sie '''Zur Karte hinzufügen''', um das Profil der aktuell geöffneten Karte hinzuzufügen. Der Dialog '''DHM Profil Optionen''' erscheint. | |||
Die Datei ''Template DEM Profile.ocd'' aus dem ''OCAD''-Verzeichnis wird standardsgemäss als Vorlagedatei (für Symbolsatz, Farben etc.) ausgewählt. Sie können eine eigene Vorlage laden, indem Sie '''Vorlage laden''' wählen. | |||
In | In der Kategorie '''Einheiten und Format''' können Sie wählen, ob die Distanz in '''km''' oder '''m''' angezeigt werden soll. Ausserdem können Sie auch das Zeitformat (im Moment nur '''h:mm''' vorhanden) und Rundungseigenschaften ('''keine Rundung''', '''Auf 5 min runden''', '''Auf 10 min runden''' einstellen. Deaktivieren Sie '''Text unterhalb des Profils anzeigen''', wenn Sie keinen Text unter Ihrem Profil wünschen. | ||
In | In der Kategorie '''Beschriftungen und Symbole''', können Beschriftungen und Symbole dem Startpunkt, Endpunkt oder einem Zwischenstopp zugeteilt werden.Geben Sie eine Beschriftung im entsprechenden Feld (z.B. Name eines Standortes) ein und wählen Sie ein Symbol aus der Dropdown-Liste. Diese Symbole sind in einer Vorlagedatei definiert. Fügen Sie der Linie, welche das Profil definiert, einen '''[[Vertices#Eckpunkt hinzufügen|Eckpunkt]]''' hinzu, um einen Zwischenstopp zu erzeugen. | ||
Wählen Sie '''OK''', um den Vorgang abzuschliessen. Die Symbole und Farben der Vorlagedatei werden zum aktuellen Symbolsatz hinzugefügt und das Profil wird angezeigt. | |||
=== | ===Drucken=== | ||
Wählen Sie '''Drucken''', um das Profil zu drucken. Das Profil wird exakt wie das Profil in der Dialogbox ausgedruckt. | |||
---- | ---- | ||
Zurück zur '''[[DHM]]'''-Seite. | |||
Aktuelle Version vom 3. September 2013, 09:43 Uhr
Um diese Funktion nutzen zu können, muss ein DHM geladen sein.
Profil erstellen 


Um ein Profil zu erstellen:
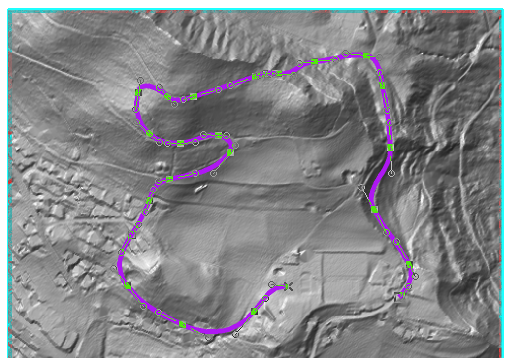
- Selektieren Sie ein Linienobjekt innerhalb der DHM Daten. Fügen Sie der Linie einen Eckpunkt hinzu, um eine Unterbrechung zu erzeugen. Unterbrechungen sind nach dem Exportieren der OCAD-Datei oder nach dem Hinzufügen zu einer Karte sichtbar.
- Wählen Sie den Befehl Profil erzeugen im DHM-Menü.
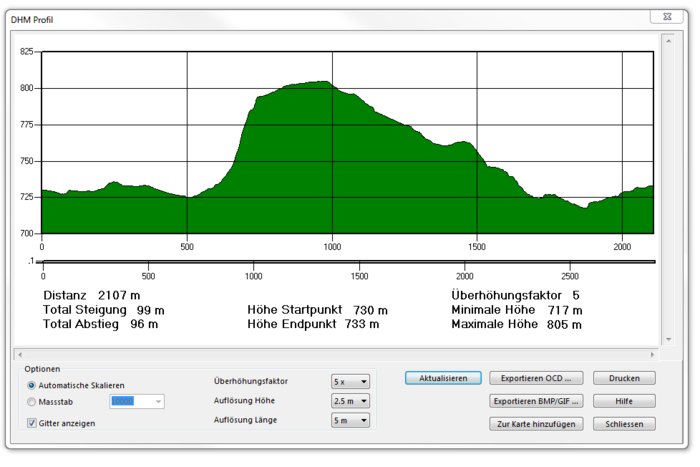
- Der DHM Profil-Dialog erscheint und das Profil wird angezeigt.
Sie haben nun mehrere Optionen:
- Automatisches Skalieren: Ist diese Option aktiviert, wählt OCAD einen Massstab, welcher am besten zur Dialogbox passt.
- Massstab: Wählen Sie den gewünschten Massstab im Dropdown-Menü.
- Gitter anzeigen: Wenn diese Option aktiviert ist, wird ein Gitter im Profil angezeigt.
- Überhöhungsfaktor: Wählen Sie einen Überhöhungsfaktor im Dropdown-Menü. Dies ist der Massstab-Faktor für die horizontale Profilachse (Höhe).
- Die Auflösungshöhe und die Auflösungslänge sind Filter, welche die Berechnung von totaler Steigung und totalem Gefälle beeinflussen. Diese Auflösungswerte sollten nicht genauer als die Auflösungshöhe und die Zellengrösse des DHMs sein.
![]() Der DHM Profil-Dialog ist ein nichtmodaler Dialog. Der Benutzer kann zum OCAD-Kartenfenster wechseln. Es ist möglich, die selektierte Linie in der OCAD-Karte zu editieren. Drücken Sie die Aktualisieren-Schaltfläche im DHM Profil-Dialog, um das Profil der bearbeiteten Linie oder das Profil einer neu selektierten Linie zu sehen.
Der DHM Profil-Dialog ist ein nichtmodaler Dialog. Der Benutzer kann zum OCAD-Kartenfenster wechseln. Es ist möglich, die selektierte Linie in der OCAD-Karte zu editieren. Drücken Sie die Aktualisieren-Schaltfläche im DHM Profil-Dialog, um das Profil der bearbeiteten Linie oder das Profil einer neu selektierten Linie zu sehen.
Profil exportieren 

OCD exportieren
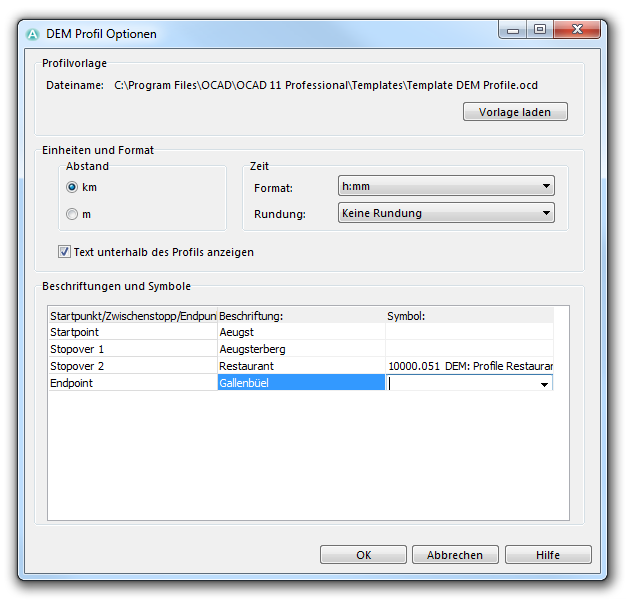
Drücken Sie die Schaltfläche OCD exportieren, um das Profil in eine neue OCD-Datei zu exportieren. Der DHM Profil Optionen-Dialog erscheint.
Die Datei Template DEM Profile.ocd im OCAD-Verzeichnis wurde standartmässig als Vorlage-Datei (Für Symbolsatz, Farben etc.) gewählt.
| Symbolnumber | Beschreibung | Symboltyp | Farbe(n) |
|---|---|---|---|
| 10000.001 | DEM: Elevation Text | Textsymbol | 10000: UPPER BLACK DEM PROFILE |
| 10000.002 | DEM: Distance Text | Textsymbol | 10000: UPPER BLACK DEM PROFILE |
| 10000.003 | DEM: Text | Textsymbol | 10000: UPPER BLACK DEM PROFILE |
| 10000.004 | DEM: Horizontal Grid Line | Liniensymbol | 10006: LOWER BLACK DEM PROFILE |
| 10000.005 | DEM: Profile Frame | Liniensymbol | 10000: UPPER BLACK DEM PROFILE |
| 10000.006 | DEM: Profile Line | Liniensymbol | 10005: LOWER RED DEM PROFILE |
| 10000.007 | DEM: Profile Area | Flächensymbol | 10003: GREEN DEM PROFILE |
| 10000.008 | DEM: White Background | Flächensymbol | 10002: WHITE DEM PROFILE |
| 10000.009 | DEM: Horizontal Tag | Punktsymbol | 10000: UPPER BLACK DEM PROFILE |
| 10000.010 | DEM: Vertical Tag | Punktsymbol | 10000: UPPER BLACK DEM PROFILE |
| 10000.011 | DEM: Time Text | Textsymbol | 10000: UPPER BLACK DEM PROFILE |
| 10000.012 | DEM: Label Text Stopover | Textsymbol | 10000: UPPER BLACK DEM PROFILE |
| 10000.014 | DEM: Label Text Start- and Endpoint | Textsymbol | 10000: UPPER BLACK DEM PROFILE |
| 10000.020 | DEM: Profile Startpoint | Punktsymbol | 10001: UPPER RED DEM PROFILE, 10004: YELLOW DEM PROFILE |
| 10000.021 | DEM: Profile Stopover | Punktsymbol | 10001: UPPER RED DEM PROFILE 10004: YELLOW DEM PROFILE |
| 10000.022 | DEM: Profile Endpoint | Punktsymbol | 10001: UPPER RED DEM PROFILE 10004: YELLOW DEM PROFILE |
| 10000.041 | DEM: Vertical Grid Line | Liniensymbol | 10006: LOWER BLACK DEM PROFILE |
| 10000.051 | DEM: Profile Restaurant | Punktsymbol | 10000: UPPER BLACK DEM PROFILE 10001: UPPER RED DEM PROFILE 10007: UPPER WHITE DEM PROFILE |
In der Kategorie Einheiten und Format können Sie wählen, ob die Distanz in km oder m angezeigt werden soll. Ausserdem können Sie auch das Zeitformat (im Moment nur h:mm vorhanden) und Rundungseigenschaften (keine Rundung, Auf 5 min runden, Auf 10 min runden einstellen. Deaktivieren Sie Text unterhalb des Profils anzeigen, wenn Sie keinen Text unter Ihrem Profil wünschen.
In der Kategorie Beschriftungen und Symbole, können Beschriftungen und Symbole dem Startpunkt, Endpunkt oder einem Zwischenstopp zugeteilt werden.Geben Sie eine Beschriftung im entsprechenden Feld (z.B. Name eines Standortes) ein und wählen Sie ein Symbol aus der Dropdown-Liste. Diese Symbole sind in einer Vorlagedatei definiert. Fügen Sie der Linie, welche das Profil definiert, einen Eckpunkt hinzu, um einen Zwischenstopp zu erzeugen.
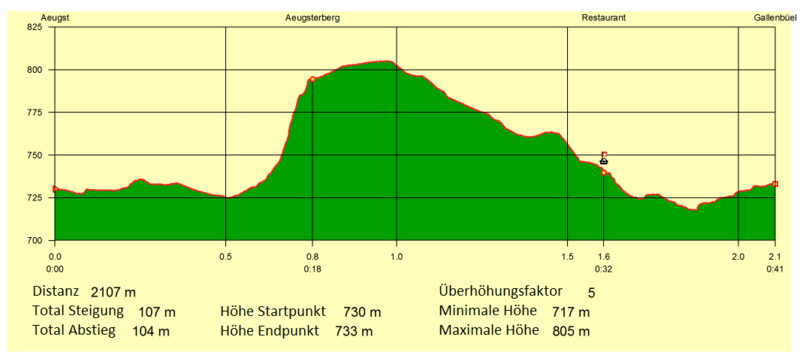
Wählen Sie OK, um den Vorgang abzuschliessen. Im nächsten Dialog müssen Sie das Profil im gewünschten Verzeichnis abspeichern. Um das Dokument zu öffnen, nutzen Sie die Funktion Kürzlich exportierte Dateien öffnen aus dem Datei-Menü. Das Profil kann dort bearbeitet werden (z.B. können Farben geändert oder Objekte hinzugefügt werden).
Zwischenstopps werden im Profil als Punkt auf der Profillinie mit einer vertikalen Linie zur x-Achse abgebildet. Sowie bei Start- und Endpunkt als auch bei den Zwischenstopps werden die zurückgelegte Distanz und Laufzeit angezeigt.
BMP oder GIF exportieren
Wählen Sie BMP/GIF exportieren, um das Profil als Rastebild zu exportieren. Der Dialog Bild speichern erscheint. Suchen Sie das gewünschte Verzeichnis und geben Sie einen Dateinamen ein. Wählen Sie den Dateitypen. Wählen Sie Speichern, um den Vorgang abzuschliessen. Das exportierte Profil sieht gleich aus wie das Profil im DHM Profil-Dialog.
Zur Karte hinzufügen
Beachten Sie: Diese Funktion ist ähnlich wie OCD exportieren. Für mehr Informationen und Hilfe besuchen Sie den entsprechenden Artikel.
Wählen Sie Zur Karte hinzufügen, um das Profil der aktuell geöffneten Karte hinzuzufügen. Der Dialog DHM Profil Optionen erscheint.
Die Datei Template DEM Profile.ocd aus dem OCAD-Verzeichnis wird standardsgemäss als Vorlagedatei (für Symbolsatz, Farben etc.) ausgewählt. Sie können eine eigene Vorlage laden, indem Sie Vorlage laden wählen.
In der Kategorie Einheiten und Format können Sie wählen, ob die Distanz in km oder m angezeigt werden soll. Ausserdem können Sie auch das Zeitformat (im Moment nur h:mm vorhanden) und Rundungseigenschaften (keine Rundung, Auf 5 min runden, Auf 10 min runden einstellen. Deaktivieren Sie Text unterhalb des Profils anzeigen, wenn Sie keinen Text unter Ihrem Profil wünschen.
In der Kategorie Beschriftungen und Symbole, können Beschriftungen und Symbole dem Startpunkt, Endpunkt oder einem Zwischenstopp zugeteilt werden.Geben Sie eine Beschriftung im entsprechenden Feld (z.B. Name eines Standortes) ein und wählen Sie ein Symbol aus der Dropdown-Liste. Diese Symbole sind in einer Vorlagedatei definiert. Fügen Sie der Linie, welche das Profil definiert, einen Eckpunkt hinzu, um einen Zwischenstopp zu erzeugen.
Wählen Sie OK, um den Vorgang abzuschliessen. Die Symbole und Farben der Vorlagedatei werden zum aktuellen Symbolsatz hinzugefügt und das Profil wird angezeigt.
Wählen Sie Drucken, um das Profil zu drucken. Das Profil wird exakt wie das Profil in der Dialogbox ausgedruckt.
Zurück zur DHM-Seite.


