Ansichtsmodus: Unterschied zwischen den Versionen
FBO (Diskussion | Beiträge) K (FBO verschob Seite View Mode nach Ansichtsmodus) |
FBO (Diskussion | Beiträge) Keine Bearbeitungszusammenfassung |
||
| Zeile 1: | Zeile 1: | ||
[[Category:Ansicht]] | |||
[[File:ViewModeExamples.PNG]] | [[File:ViewModeExamples.PNG]] | ||
==Normal | ==Normal-Ansicht [[File:Space.PNG]][[File:Pro40px.PNG|Diese Funktion ist verfügbar in OCAD 11 Professional.|link=https://www.ocad.com/de/produkte/ocad-fuer-kartografie]][[File:Std40px.PNG|Diese Funktion ist verfügbar in OCAD 11 Orienteering Standard.|link=https://www.ocad.com/de/produkte/ocad-fuer-orientierungslauf]][[File:Sta40px.PNG|Diese Funktion ist verfügbar in OCAD 11 Starter.|link=https://www.ocad.com/de/produkte/ocad-fuer-orientierungslauf]][[File:View40px.PNG|Diese Funktion ist verfügbar in OCAD 11 Viewer.|link=https://www.ocad.com/de/downloads/ocad-viewer]][[File:CS40px.PNG|Diese Funktion ist verfügbar in OCAD 11 Course Setting.|link=https://www.ocad.com/de/produkte/ocad-fuer-orientierungslauf]]== | ||
In | In der '''Normal-Ansicht''' werden alle Kartenobjekte absolut intransparent angezeigt und liegen über der '''[[Hintergrundkarte]]'''. Dies sieht folgendermassen aus: | ||
[[File:View_NormalMode.PNG|800px]] | [[File:View_NormalMode.PNG|800px]] | ||
== | ==Echtfarben-Ansicht [[File:Space.PNG]][[File:Pro40px.PNG|Diese Funktion ist verfügbar in OCAD 11 Professional.|link=https://www.ocad.com/de/produkte/ocad-fuer-kartografie]][[File:Std40px.PNG|Diese Funktion ist verfügbar in OCAD 11 Orienteering Standard.|link=https://www.ocad.com/de/produkte/ocad-fuer-orientierungslauf]][[File:Sta40px.PNG|Diese Funktion ist verfügbar in OCAD 11 Starter.|link=https://www.ocad.com/de/produkte/ocad-fuer-orientierungslauf]][[File:View40px.PNG|Diese Funktion ist verfügbar in OCAD 11 Viewer.|link=https://www.ocad.com/de/downloads/ocad-viewer]][[File:CS40px.PNG|Diese Funktion ist verfügbar in OCAD 11 Course Setting.|link=https://www.ocad.com/de/produkte/ocad-fuer-orientierungslauf]]== | ||
Dieser Menüpunkt ist aktiviert, sobald mindestens eine Echtfarbe definiert ist ('''[[Echtfarben definieren]]'''). | |||
Wählen Sie diesen Menüpunkt, um eine Vorschau des Echtfarbendrucks zu erhalten. Wählen Sie den '''[[Echtfarben definieren]]'''-Menüpunkt des '''[[Karte]]'''-Menüs, um zu definieren, wie Echtfarben auf dem Bildschirm angezeigt werden. | |||
'''[[Hintergrundkarte|Rasterhintergrundkarten]]''' sind nur sichtbar, wenn diese einer Echtfarbe im '''[[Hintegrundkarte]]'''-Dialogfenster zugewiesen sind. OCAD-'''[[Hintergrundkarte|Hintergrundkarten]]''' sind in diesem Modus nicht sichtbar. | |||
Echtfarben erscheinen transparent, um eine Vorschau des Drucks zu erhalten. | |||
[[File:View_SpotColorMode.PNG|800px]] | [[File:View_SpotColorMode.PNG|800px]] | ||
== | ==Entwurfsmodus [[File:Space.PNG]][[File:Pro40px.PNG|Diese Funktion ist verfügbar in OCAD 11 Professional.|link=https://www.ocad.com/de/produkte/ocad-fuer-kartografie]][[File:Std40px.PNG|Diese Funktion ist verfügbar in OCAD 11 Orienteering Standard.|link=https://www.ocad.com/de/produkte/ocad-fuer-orientierungslauf]][[File:Sta40px.PNG|Diese Funktion ist verfügbar in OCAD 11 Starter.|link=https://www.ocad.com/de/produkte/ocad-fuer-orientierungslauf]][[File:View40px.PNG|Diese Funktion ist verfügbar in OCAD 11 Viewer.|link=https://www.ocad.com/de/downloads/ocad-viewer]][[File:CS40px.PNG|Diese Funktion ist verfügbar in OCAD 11 Course Setting.|link=https://www.ocad.com/de/produkte/ocad-fuer-orientierungslauf]]== | ||
Wählen Sie diesen Menüpunkt im '''[[Ansicht]]'''-Menü, um die Karte und '''[[Hintergrundkarte|Hintergrundkarten]]''' im Entwurfsmodus anzuzeigen. | |||
Der Entwurfsmodus-Schieber [[File:DraftMode.JPG]] erscheint in der '''[[Graphische Benutzeroberfläche#Ansicht-Werkzeugleiste|Ansicht-Werkzeugleiste]]'''. | |||
Im Entwurfsmodus wird die Karte transparent angezeigt, sodass die Hintergrundkarten sichtbar werden. | |||
Mit dem Entwurfsmodus-Schieber können Sie die Transparenz der Karte und der Hintergrundkarten regulieren. | |||
Benutzen Sie den oberen Schieber (das M steht für '''[[Karte|Map]]'''), um die Karte zu regulieren und den unteren Schieber (B steht für '''[[Hintergrundkarte|Background Map]]''') für das Regulieren der Hintergrundkarten. | |||
- 0 ( | - 0 (Schieber ganz links) bedeutet, dass die Karte/Hintergrundkarte unsichtbar ist. | ||
- 100 ( | - 100 (Schieber ganz rechts) bedeutet, dass die Karte/Hintergrundkarte vollständig Undurchsichtig ist. | ||
[[File:Hint.jpg]] | [[File:Hint.jpg]] Der Entwurfsmodus ersetzt den '''Transparenzmodus''' von OCAD 8. Um die Deckkraft einer Farbe zu ändern wählen Sie den '''[[Farben]]'''-Menüpunkt im '''[[Karte]]'''-Menü. Hier können Sie die '''Opazität (Deckkraft)''' für jede Farbe anpassen. | ||
[[File:View_DraftMode.PNG|800px]] | [[File:View_DraftMode.PNG|800px]] | ||
Version vom 17. Januar 2013, 12:06 Uhr
Normal-Ansicht 


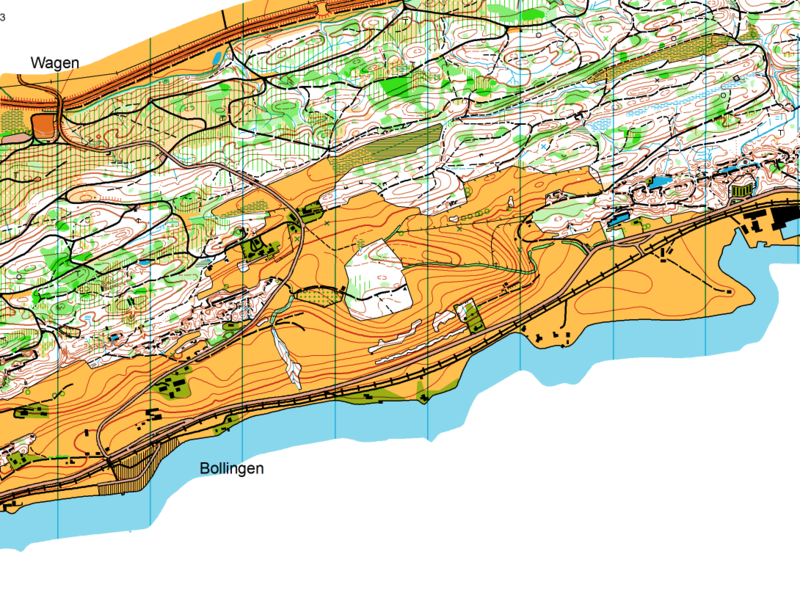
In der Normal-Ansicht werden alle Kartenobjekte absolut intransparent angezeigt und liegen über der Hintergrundkarte. Dies sieht folgendermassen aus:
Echtfarben-Ansicht 


Dieser Menüpunkt ist aktiviert, sobald mindestens eine Echtfarbe definiert ist (Echtfarben definieren).
Wählen Sie diesen Menüpunkt, um eine Vorschau des Echtfarbendrucks zu erhalten. Wählen Sie den Echtfarben definieren-Menüpunkt des Karte-Menüs, um zu definieren, wie Echtfarben auf dem Bildschirm angezeigt werden.
Rasterhintergrundkarten sind nur sichtbar, wenn diese einer Echtfarbe im Hintegrundkarte-Dialogfenster zugewiesen sind. OCAD-Hintergrundkarten sind in diesem Modus nicht sichtbar.
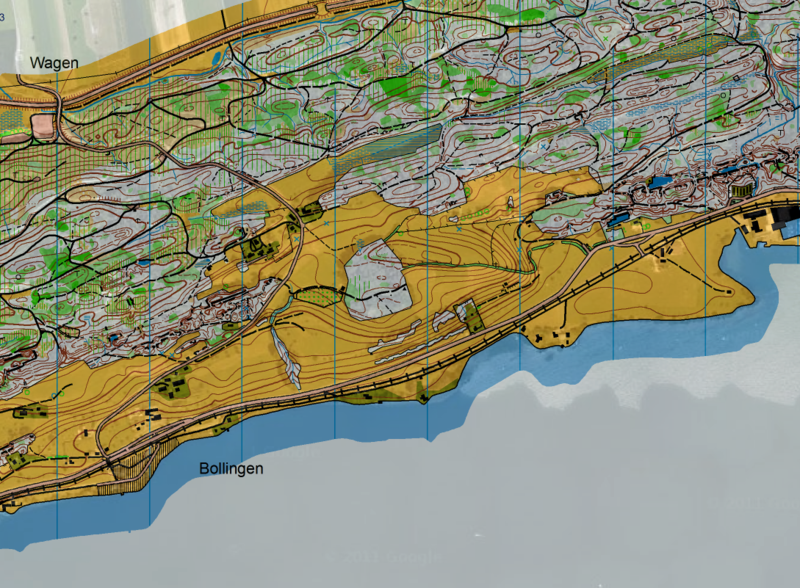
Echtfarben erscheinen transparent, um eine Vorschau des Drucks zu erhalten.
Entwurfsmodus 


Wählen Sie diesen Menüpunkt im Ansicht-Menü, um die Karte und Hintergrundkarten im Entwurfsmodus anzuzeigen.
Der Entwurfsmodus-Schieber erscheint in der Ansicht-Werkzeugleiste.
Im Entwurfsmodus wird die Karte transparent angezeigt, sodass die Hintergrundkarten sichtbar werden.
Mit dem Entwurfsmodus-Schieber können Sie die Transparenz der Karte und der Hintergrundkarten regulieren.
Benutzen Sie den oberen Schieber (das M steht für Map), um die Karte zu regulieren und den unteren Schieber (B steht für Background Map) für das Regulieren der Hintergrundkarten.
- 0 (Schieber ganz links) bedeutet, dass die Karte/Hintergrundkarte unsichtbar ist.
- 100 (Schieber ganz rechts) bedeutet, dass die Karte/Hintergrundkarte vollständig Undurchsichtig ist.
![]() Der Entwurfsmodus ersetzt den Transparenzmodus von OCAD 8. Um die Deckkraft einer Farbe zu ändern wählen Sie den Farben-Menüpunkt im Karte-Menü. Hier können Sie die Opazität (Deckkraft) für jede Farbe anpassen.
Der Entwurfsmodus ersetzt den Transparenzmodus von OCAD 8. Um die Deckkraft einer Farbe zu ändern wählen Sie den Farben-Menüpunkt im Karte-Menü. Hier können Sie die Opazität (Deckkraft) für jede Farbe anpassen.
Draft Mode Only Background Map Favorites 


Choose the Draft Mode (Only Background Favorites) command in the View menu to change to this view mode. This view mode has the same characteristics as the Draft Mode, with the exception that only background maps marked as favorites are displayed. Visit the Visibility Features article of the Background Map page to learn how to set a background map to the favorites.
View Mode Loop 


Define View Mode Loop
With the View Mode Loop you can switch between different drawing modes using a Shortcut.
In the View category of the OCAD Preferences found in the Options menu you can declare which view modes shall be included in the View Mode Loop. All four view modes are available: Normal Mode, Spot Color Mode, Draft Mode and Draft Mode (Only Background Favorites).
Choose the Shortcuts command in the Options menu to assign a Shortcut. Search for the View - View mode loop entry in the shortcut list. Select it and choose a shortcut from the Shortcut dropdown menu (e.g. F11). Click the Close button to finish.
Next View Mode in Loop
By using your defined shortcut (e.g. pressing the F11 key), you can switch between the view modes selected in OCAD Preferences.
Back to the View page.


